Hex Hex nuts are the most common fasteners used in construction, automobiles, machinery, furniture and in do-it-yourself projects. Even though they are small, they are essential in ensure buildings are safe and secure.
Being able to comprehend the sizes of hex nuts, grades, measurement and how to use them correctly avoids failures and provides long lasting assemblies.
This complete guide explains what a hex nut is, how to measure it, different types, common uses, and safe tightening and removal methods—even without a wrench.
What Is a Hex Nut?
A hex nut is a six-sided internally threaded fastener designed to be used with a matching bolt, screw, or threaded rod. Its hexagonal shape allows easy tightening and loosening using standard tools such as wrenches or sockets.
The principle behind hex nuts is that the two or more components are clamped when threaded on a bolt. The friction of the nut, the bolt and the surface does not allow movement and helps to keep the structure intact.
Hex nuts are available in:
Metric and imperial sizes
Multiple materials (steel, stainless steel, brass)
Different strength grades for light to heavy-duty applications
What Does a Hex Nut Look Like?
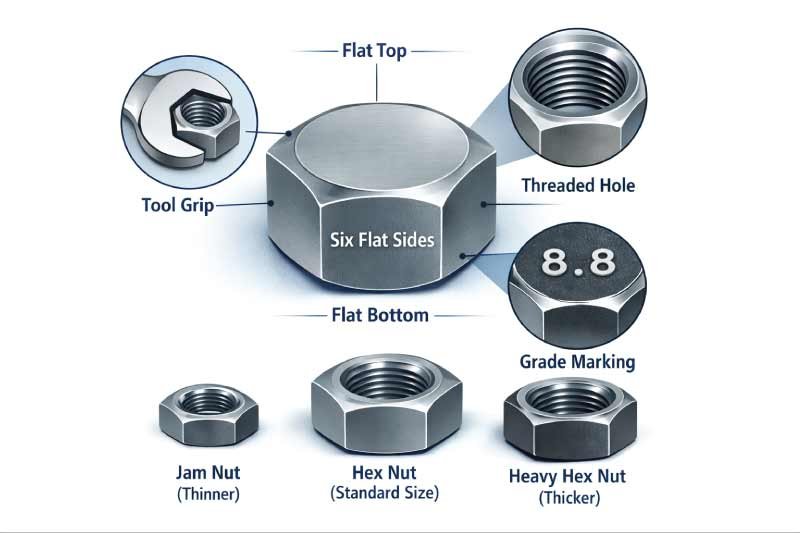
A hex nut is easy to recognize by its simple and practical design. It is a tiny metal screw that is designed depending on tightening with the usual tools. Knowledge on the appearance of a hex nut aids in determining the right type, size, and grade of a nut to use in the proper and safe fastening of any project.
Six flat sides (hexagonal shape)
A central threaded hole
Flat top and bottom surfaces
The flat edges make the tools grippy and the internal threads match the thread size and pitch of the bolt. There are hex nuts, which have markings on the top surface, which denotes the material or strength grade. Visually, hex nuts are compact, symmetrical, and thicker than jam nuts but thinner than heavy hex nuts.
How to Measure Hex Nut Size
Accurate measurement of the hex nut means that it is put in the right bolt, wrench, and use. Measurement ensures that there are no thread damages, loosening and safety concerns. This size of hex nuts is determined by three primary factors which include thread size, width across flats and thickness of the nut.
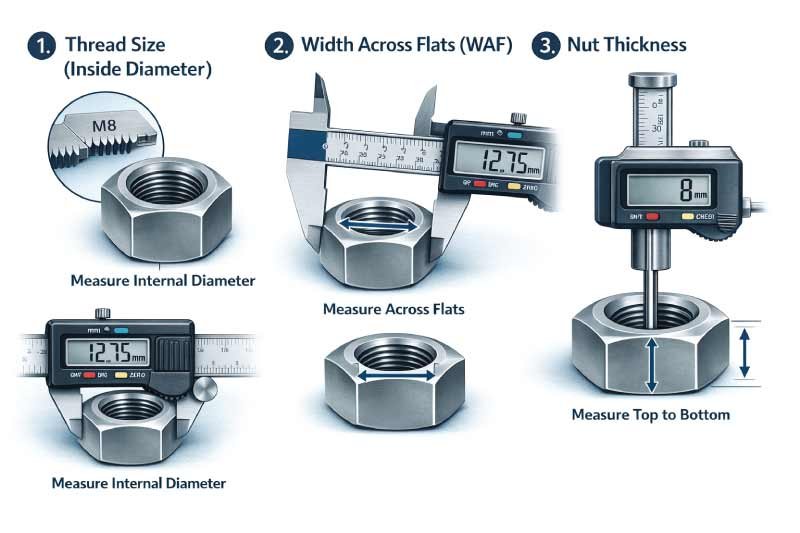
1. Thread Size (Inside Diameter)
Thread size- This can be determined through calculation of the internal diameter of the hex nut with a caliper or thread gauge. It is the measurement of the right size of the bolt like M8 or 1/2 inch to make sure that the thread is engaged correctly and secure and reliable connection is formed.
2. Width Across Flats (WAF)
Width across flats This is the distance between opposite flat sides of the hex nut. It is used to determine the proper wrench/socket size, which prevents rounding off the edges of the nut and allows the tightening or loosening to be carried out safely and efficiently during installation or maintenance.
3. Nut Thickness
Nut thickness- The height of the hex nut between the surface on the top and the one at the bottom. Thickness influences the clamping strength and load distribution and assists in distinguishing between regular hex nuts, thinner jam nuts and thicker heavy hex nuts which are used in structural work.
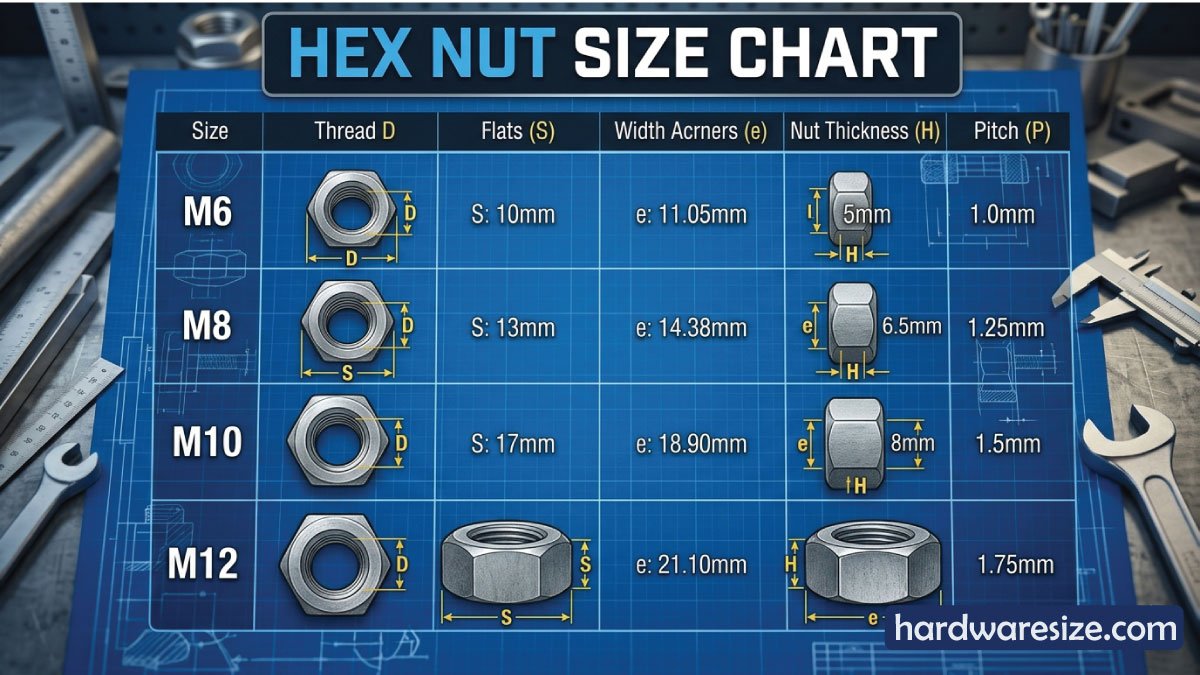
Hex Nut Measurement Table (Metric)
| Nut Size | Thread Diameter | Width Across Flats | Thickness |
|---|---|---|---|
| M6 | 6 mm | 10 mm | 5 mm |
| M8 | 8 mm | 13 mm | 6.5 mm |
| M10 | 10 mm | 17 mm | 8 mm |
| M12 | 12 mm | 19 mm | 10 mm |
What Is a Heavy Hex Nut? (Definition)
A heavy hex nut is a fatter and broader form of a standard hex nut, made to be used to carry heavy loads and structural purposes. It has more bearing surface which gives it more strength, better load distribution and easier resistance to loosening.
Structural steel Construction Structural steel connections, bridges, oil and gas equipment, and heavy machines are commonly connected with heavy hex nuts, which are normally accompanied by high-strength bolts.
What Is a Hex Jam Nut?
A hex jam nut is a thinner version of a standard hex nut, mainly used to lock another nut in place. It does not provide primary clamp force but prevents loose caused by vibration, ensure stability in threaded assemblies.
Jam nuts are often used:
In pairs with standard hex nuts
In applications with limited space
As locking nuts on threaded rods
Because of their reduced thickness, jam nuts should not be used alone in high-load applications.
What Is a Hex Nut Used For?
Hex nuts are key screws in the installation of bolts in a vast variety of jobs, both in building work and in industrial equipment and the fitting of automobiles, furniture, and so on. They are powerful clamping force, easy to install and reusable.
The choice of the appropriate size and grade is comforting, stable and can guarantee the duration of performance in any project.
Construction framing and steel structures
Automotive engines and suspension systems
Industrial machinery and equipment
Furniture assembly
Home repair and DIY projects
They provide:
Strong clamping force
Easy installation and removal
Reusability
Choosing the correct nut size and grade ensures safety and long-term performance.
Hex Nut Grades Explained
Strength grades characterize the hex nuts and this is determined by their load carrying capacity, their hardness and the applications that they can be used in. The right grade is a way of achieving structural integrity and avoiding failures.
Grading on the higher grades is stronger with less flexibility and lower grades are used on light duty applications, which is why it is necessary to select the appropriate grade based on safety and performance requirements.
Common Hex Nut Grades Table
| Grade | Material | Strength Level | Typical Use |
|---|---|---|---|
| Grade 2 | Low-carbon steel | Low | Furniture, light-duty |
| Grade 5 | Medium-carbon steel | Medium | Automotive, machinery |
| Grade 8 | Heat-treated steel | High | Heavy-duty, structural |
| Stainless Steel | Corrosion-resistant steel | Medium | Outdoor, marine |
Higher grades are stronger but less flexible, making correct selection critical.
How to Tighten a Hex Nut
A tightening of a hex nut is the right thing to do to ensure a safe and good connection. Proper technique makes sure the nut and bolt contain parts which are not damaged because they are firmly positioned.
One of the most effective methods by which stripped threads can be avoided as well as joint failure are the appropriate use of tools, even torque, and not overtightening, which is essential in any application.
To tighten a hex nut properly:
Place the nut onto the bolt by hand
Turn clockwise until snug
Use a wrench or socket to tighten further
Apply torque evenly—do not overtighten
For critical applications, use a torque wrench to meet manufacturer specifications. Overtightening can strip threads or cause bolt failure.
How to Remove a Hex Nut
It might be easy to take out a hex nut, however, it is difficult to do it right and avoid breaking the nut, as well as the parts that are nearby. With the help of the appropriate tools and techniques, safety, efficiency, and prevention of stripping or rounding of threads become possible. These are the steps to follow when removing a hex nut which is stuck or rusted.
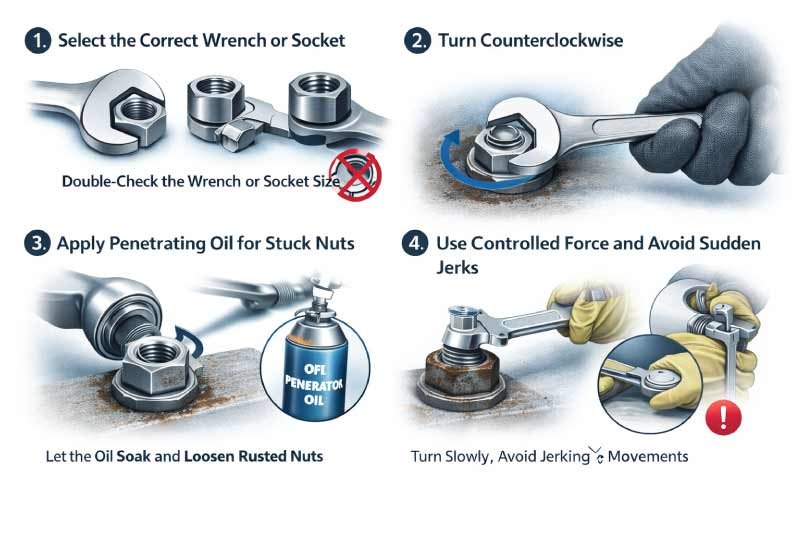
1. Select the Correct Wrench or Socket
The appropriate size wrench / socket is important in order to remove the hex nuts safely and efficiently. The wrong size of a tool may round corners of the nut, and then it is hard to remove and can easily harden the bolt or the material around it. Always check the size twice and then apply the force.
2. Turn Counterclockwise
In order to loosen a hex nut, you must turn it anti-clockwise. Use a slow and continuous pressure to prevent sliding or breaking the nut. In order to achieve the smooth disengagement of the threads, it is vital to maintain steady movement that decreases the chances of being harmed or damaging the nut when taking the threads out.
3. Apply Penetrating Oil for Stuck Nuts
In case the hex nut is rusted or stuck, use penetrating oil on the threads. Allow it to dry over a few minutes to minimize friction and corrosion. It assists in the nut loosening when you turn it using a wrench, you are not applying too much force, and might not break it.
4. Use Controlled Force and Avoid Sudden Jerks
To loosen a hex nut, labor slowly and not abruptly. Sudden motions will either break the tools, bend the nut, or break your hands. Its removal is safe with constant pressure and patience and that the surrounding components and the fastener are not damaged.
How to Remove a Hex Nut Without a Wrench
Sometimes there might be a lack of a wrench, but it is possible to still remove a hex nut through alternative means. Adequate use of such methods will avoid harm to the nut, bolt or other components around it. NEVER go in a hurry or be careless, particularly with rusted or firmly screwed nuts.
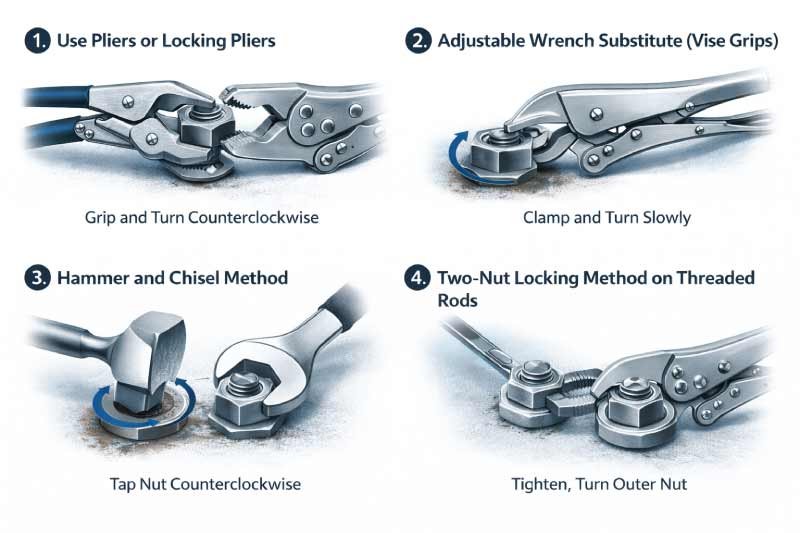
1. Use Pliers or Locking Pliers
Pliers or locking pliers may be sufficient to rotate a small or medium tight hex nut. Place the tool on the flat sides and press on firmly and then turn it counterclockwise. This technique is effective in low-torque usage, but can have difficulties with larger or more tightly turned nuts.
2. Adjustable Wrench Substitute (Vise Grips)
In case of the absence of a wrench, vise grips may also serve as a temporary solution. You need to clamp the grips to the hex nut and rotate slowly. Make sure that it is firmly held so as to avoid slipping or rounding the corners of the nut. This technique is the best when dealing with medium-sized nuts with average torque.
3. Hammer and Chisel Method
Stuck or rusted hex nuts may be tapped with a hammer and chisel, in a counterclockwise direction. It is necessary to place the chisel along the edge of the nut and hammer it lightly using the hammer to loosen it. This must be accurate to prevent harm to the nut, bolt or other material around it.
4. Two-Nut Locking Method on Threaded Rods
On the threaded rods, the two-nut locking technique will be useful in loosening a stuck nut without a wrench. Bend a second nut upon the first and clamp them together. Then apply the tools or pliers to the outer nut and open both at the same time to offer leverage to the stuck nut so as to loosen it in a safe manner.
How to Unscrew a Hex Nut
It is not that easy to unscrew a hex nut, but it is meant to be done properly, this way one is sure of not damaging the bolt, nut or the surrounding parts. Using good practices will enable easy removal even of rusted or stuck nuts without stripping the threads and injuries.
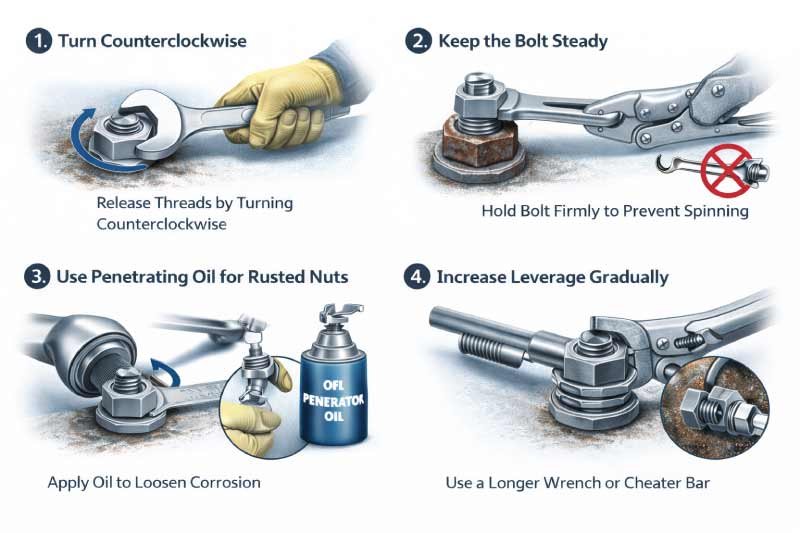
1. Turn Counterclockwise
To unscrew a hex nut, always turn it counterclockwise. This standard direction releases the threads from the bolt gradually. Apply steady and controlled pressure to avoid slippings, round the nut corners, or damage the bolt threads during the process.
2. Keep the Bolt Steady
Turning the nut Turn the bolt firmly, should it be possible. This does not allow the bolt to turn with the nut thus the threads disengage appropriately. One can make the process easier and safer by stabilizing the bolt with a second wrench or pliers.
3. Use Penetrating Oil for Rusted Nuts
Stuck or rusted hex nuts may be treated using penetrating oil on the threads. Let it soak a few few minutes to get off friction and loosen corrosion. This assists the nut in turning much easier and avoids unnecessary force which may harm the nut or bolt.
4. Increase Leverage Gradually
In a situation where the nut is very tight, leverage can be raised slowly by extending the wrench, pipe or cheater bar. Use moderate and uniform pressure instead of the abrupt pressure to avoid the slipping or rounding of the nut corners. Clumsy gradual movement is more secure and efficient.
5. Check for Stripped or Rotating Bolts
When the hex nut rotates freely, but does not lose, it is possible that the bolt is stripped or rotating with the nut. When this is the case, check the threads attentively. You might have to stabilize the bolt, or change damaged parts, or you may have to use specialized tools in order to remove the nut safely.
Hex Nut Wrench Size Chart
It is important to know the right wrench size to use in a hex nut as it is used to fasten or remove material safely and efficiently. A correct tool will eliminate the rounding of the nut corners, damage to bolts, and appropriateness of the torque.
The table below is a rough guide to the most common hex nut sizes in metric and imperial measurements.
| Nut Size | Wrench Size (Metric) | Wrench Size (Imperial) |
|---|---|---|
| M6 | 10 mm | 3/8″ |
| M8 | 13 mm | 1/2″ |
| M10 | 17 mm | 11/16″ |
| M12 | 19 mm | 3/4″ |
Using the correct wrench size prevents rounding the nut corners.
Final Thoughts
Hex nuts might not be complicated, but the correct size, grade and type can greatly influence the safety and performance. It may be when you assemble furniture, repair a car, or operate heavy equipment, since you are using hex nuts, it helps to know how they work to produce solid and professional results.
When the hex nuts are measured properly, tightened properly and removed safely, they will remain as one of the most reliable fasteners in any project.
Also Read:
👉 Discover everything you need to know about Nut Size Chart: Types, Materials and Applications in this comprehensive guide. Learn how to choose the right nut size, understand different materials, and explore their practical uses. Whether for DIY, construction, or machinery, this post helps you select the perfect nut for every project—read the full guide now!

Engineer Hassan is a Mechanical Engineer with over 16 years of hands-on experience in mechanical hardware, fasteners, bolts, screws, nuts, washers, and related mechanical components. He has extensive expertise in selecting, measuring, and installing hardware, ensuring accuracy, safety, and reliability in every project.
Through Hardware Size, he provides detailed size charts, installation guides, and technical tutorials, helping engineers, technicians, students, and DIY enthusiasts solve practical hardware problems with confidence.