These are the most prevalent and vexing issues in mechanical labor, which are striped screws. It can be a screw that is stripped when repairing machinery, working on automotive panel, fixing appliances, or metal structures you could be assembling and slows down the whole work.
The trick is that it is essential to be aware of the right way of removal depending on the state of the screw and the material around it.
This guide explains step-by-step methods professionals use to safely remove stripped screws from metal without damaging the workpiece.
Understand What “Stripped” Means
When the drive recess (Phillips, flat, Torx, hex, etc.) has been damaged and cannot hold the screwdriver in place anymore, the screw is stripped. There are also instances whereby the screw threads tend to seize within the metal because of rust, corrosion, or over tightening.
There are three common stripped scenarios:
- The head is partially damaged but still visible.
- The head is completely rounded.
- The screw is stuck due to rust or over-torque.
Each condition requires a different approach.
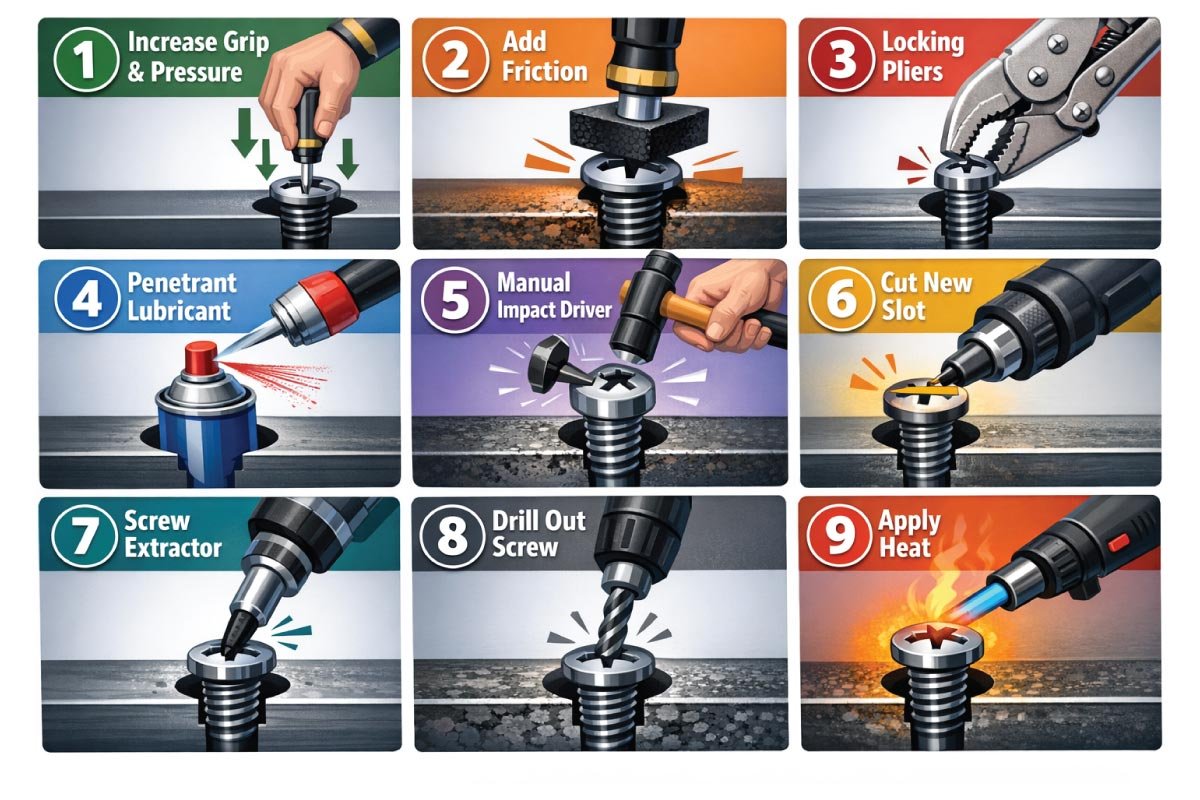
Step-by-Step methods How to Remove Stripped Screws from Metal
Step 1: Inspect Before Acting
Before trying to remove the screw, first thoroughly examine the state of the screw and surrounding the metal. An inspection like this will also save you unnecessary damage and will allow you to make a choice of the safest and most effective way of removal in the first place.
Before try any removal method:
-
Identify the screw type.
-
Check if the head is exposed or flush.
-
Look for rust or corrosion.
-
Determine whether the surrounding metal is thick or thin.
Never rush this stage. Choose the wrong method can worsen the damage.
Method 1: Increase Grip and Downward Pressure
In cases where the screw is just a bit stripped, no aggressive means are likely to be needed. In most situations, it is sufficient to enhance driver engagement and introduce controlled pressure to eliminate it safely without causing harm to the nearby metal surface.
If the screw is only slightly stripped, you may not need special tools.
Technique:
-
Use the correct size driver bit.
-
Press firmly downward while turning slowly.
-
Use a hand screwdriver instead of a drill for better control.
Applying steady downward force helps the bit catch any remaining edges inside the damaged head. This works best for lightly stripped screws in sheet metal or light-duty assemblies.
Method 2: Use Friction to Improve Bite
When using a screwdriver that slips but the screw head is not damaged entirely, it may help to apply a little bit more friction between the tool and the screw to make the screw removal possible. It is an easy technique and can be quite useful in situations of strip-down.
In case of little slipping, more friction can be used.
Practical Approach:
-
Place a piece of rubber material between the driver and screw head.
-
Apply strong downward pressure.
-
Turn slowly without sudden jerks.
The added friction fills gaps in the stripped recess and improves grip. This method is simple but surprisingly effective for shallow damage.
Method 3: Use Locking Pliers (If the Head Is Exposed)
In those cases where the screw head sticks out of the metal surface, then it can be gripped externally. Locking pliers offer good torque and can be used in mechanical clamping to be the fastest and commonest method of achieving success on stubborn screws in an exposed location.
If the screw head is above the metal surface, mechanical gripping is often the fastest solution.
Steps:
-
Clamp locking pliers tightly around the screw head.
-
Adjust tension so the pliers bite firmly.
-
Turn counterclockwise slowly.
-
Rock slightly back and forth to break resistance.
This method provides strong torque and works well for machine screws or bolts. It will not work if the head is flush with the surface.
Method 4: Apply Penetrate Lubricant for Seized Screws
Not only are a lot of stripped screws damaged at the end, but they are also gripped in the pit in-between the threads through rust or corrosion.
By lubricating the joint, friction is minimized and oxidation bonds are loosened and thus easier to remove.
Numerous stripped screws are in reality corroded. They can be forced to dry and this may cause further destruction to threads.
Procedure:
-
Apply penetrating lubricant to the screw head and surrounding area.
-
Allow time for the lubricant to travel into the threads (10–30 minutes minimum).
-
Attempt removal again using steady torque.
For heavily rusted screws, waiting several hours improves effectiveness. Lubrication reduces friction and helps break rust bonds between threads and metal.
Method 5: Use a Manual Impact Driver
In tight screws that are not totally broken, the use of a manual impact driver can provide a controlled shock force. The tool can be of some help during assemblies that involve screws that are deeply seated in metals. A manual impact driver is very efficient with tight or partly stripped screws of metal assemblies.
Why It Works:
An impact driver converts hammer force into rotational torque while push the downward at the same time. This prevents slipping and improves grip.
Steps:
-
Insert the correct bit into the impact tool.
-
Place the tool firmly into the screw head.
-
Strike the top with a hammer.
-
The tool rotates slightly with each hit.
This method works especially well in automotive and heavy mechanical applications.
Method 6: Cut a New Slot in the Screw Head
In an instance whereby the screw head is perfectly rounded and can no longer hold any driver, it is feasible to make a new drive slot that gives a new turning surface.
This planned alteration usually spares the surround metal to invasive techniques. In case the screw head is entirely rounded, it is a clever idea to make a new drive surface.
How to Do It:
-
Use a rotary cutting tool or small cutting wheel.
-
Cut a straight slot across the screw head.
-
Insert a flat-head screwdriver.
-
Apply steady pressure and turn slowly.
This effectively converts the damaged screw into a flat-head type. Be careful not to cut too deep, especially in thin metal panels.
Method 7: Use a Screw Extractor (Professional Solution)
When all other means fail, a screw extractor is developed, being specifically made to take off stripped screws, or broken screws. It offers a controlled removal and does not enlarge the surrounding hole too much when used properly. A screw extractor is the sure way to go when conventional procedures are ineffective.
Step-by-Step Process:
-
Drill a small pilot hole into the center of the stripped screw.
-
Insert the extractor into the hole.
-
Turn the extractor counterclockwise using a wrench.
-
The reverse-threaded design grips the screw and backs it out.
Important points:
-
Drill straight and centered.
-
Use moderate speed.
-
Avoid breaking the extractor inside the screw.
This method works well for flush or recessed screws in solid metal.
Method 8: Drill Out the Screw (Last Resort)
In case of all extraction efforts, it can be required to drill out the screw. This method is permanent, eliminating the screw, but must be done very carefully to avoid damaging other threads and keep the holes where they belong. In case of extraction failure full drilling can be done.
Procedure:
-
Select a drill bit close to the screw shaft diameter.
-
Drill directly into the screw center.
-
Continue drilling until the head separates.
-
Remove the remaining threaded section with pliers.
After removal:
-
Clean internal threads with a tap.
-
Replace with a new screw of proper grade.
Drilling should only be used when other methods fail because it permanently removes the original screw.
Method 9: Apply Controlled Heat for removing stripped screws
In situations where the screw has been bonded with corrosion, it is possible to loosen the screw a little more by controlled heating and thereby breaking the rust-seal.
This kind of approach should be taken with care not to harm. Heat expands metal and can break corrosion bonds.
Steps:
-
Apply controlled heat to the screw area.
-
Allow slight cooling.
-
Attempt removal while warm.
Heat works best on larger metal parts. Avoid overheating thin sheet metal or sensitive components.
Also Read:
Thread Damage and Repair
During removal, internal threads may become damaged, especially if the screw was severely seized. Restore the thread integrity ensures structural reliability and prevents future fastening problems in metal assemblies.
Sometimes the screw removal damages internal threads.
Solutions:
-
Retap the hole with correct tap size.
-
Install a thread insert if threads are severely damaged.
-
Use a slightly larger screw only if structurally acceptable.
Preserve the thread integrity is critical in load-bearing metal assemblies.
Common Mistakes to Avoid when removed Stripped Screws
Problems related to stripped screws are usually aggravated by improper procedures or hasty judgment. The knowledge of typical mistakes will ensure that further damage is not done to the screw, the surrounding metal and internal threads.
-
Use the wrong screwdriver size.
-
Apply the excessive speed with power drills.
-
Drilling off-center.
-
Ignore lubrication.
-
Force the screw without stabilize the workpiece.
Most damage occurs because of rush the process.
Safety Considerations When Removing Stripped Screws
Metal fasteners require cutting, drilling, torque and occasionally heat. Incorrect safety measures minimize the risk of an injury and stabilize the process of removal, which has to be not only controlled but also professional.
-
Wear safety glasses when drilling or cutting.
-
Secure metal in a vise before applying torque.
-
Keep hands clear of rotating tools.
-
Use gloves when handling sharp metal edges.
Safety should never be ignored during extraction work.
Preventing Stripped Screws in Metal
It is always more effective to prevent than to cure, and at least avoid ripped screws. Proper installation, tool selection and regulated application of torque have a big role to play in minimize the chances of future strip type of problems.
Prevention is better than removal. To avoid future issues:
-
Always match driver size exactly to screw head.
-
Use quality driver bits.
-
Apply steady downward pressure while tightening.
-
Avoid overtightening.
-
Use anti-seize compound for metal-to-metal assemblies.
-
Replace worn bits immediately.
Using torque-controlled tools for mechanical assemblies significantly reduces stripping risk.
Choose the Right Removal Method for Stripped Screws
Choice of the right removal technique is based on the screw condition, exposure and extent of damage. Less aggressive techniques can be used initially, and avoid needless repairs.
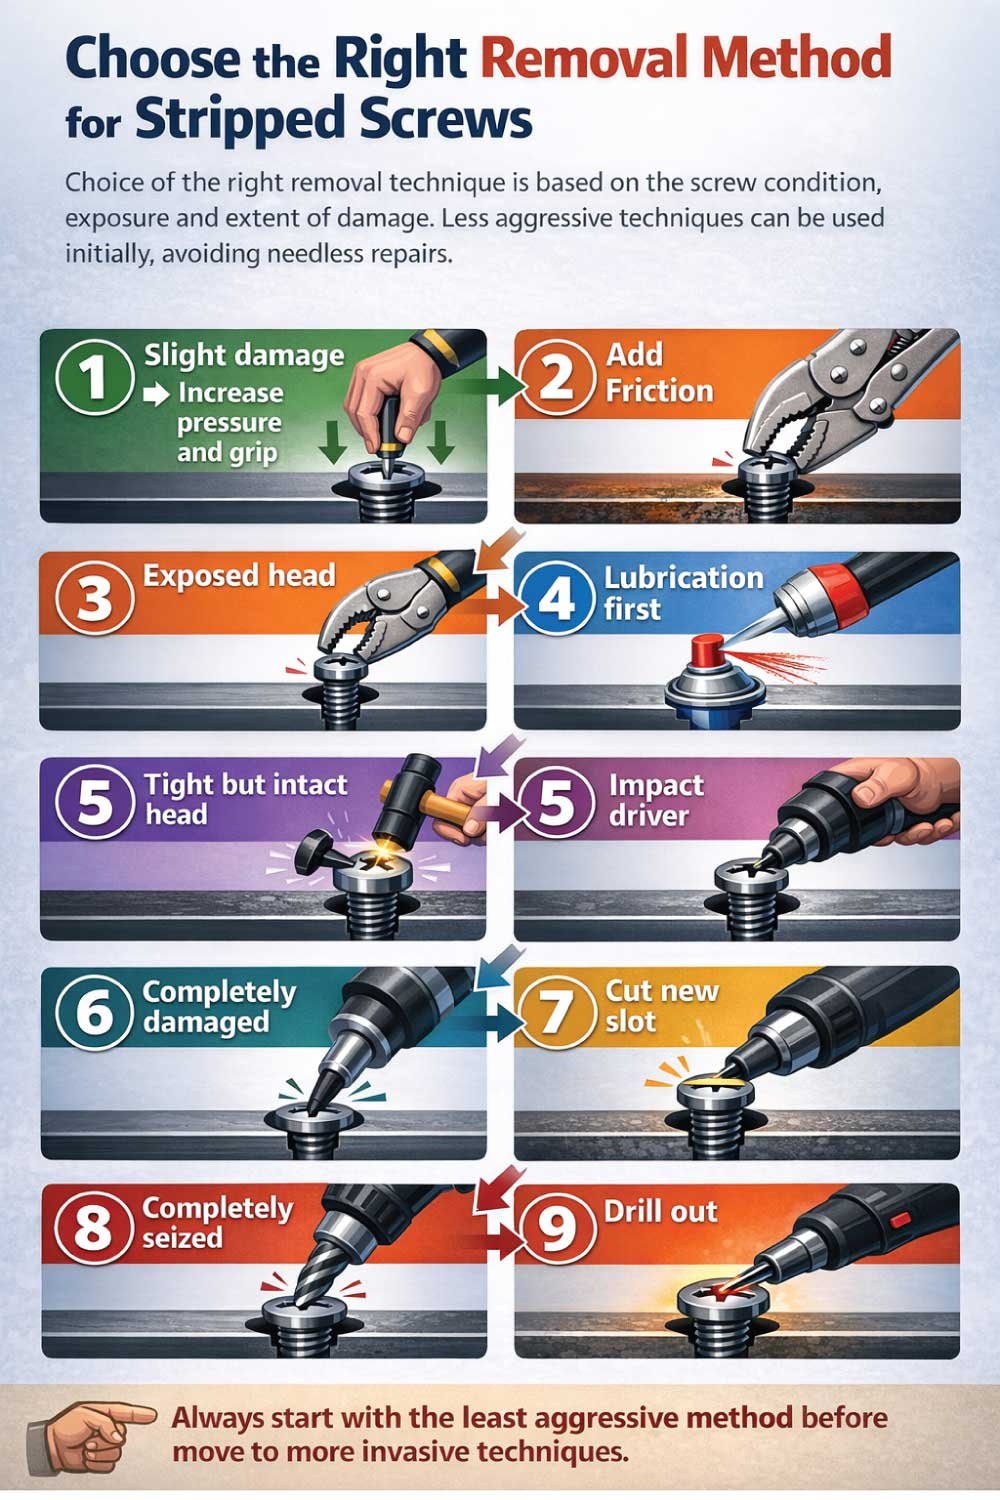
Here is a practical decision approach:
-
Slight damage → Increase pressure and grip.
-
Exposed head → Locking pliers.
-
Rusted screw → Lubrication first.
-
Tight but intact head → Impact driver.
-
Completely rounded → Cut new slot.
-
Flush and badly damaged → Screw extractor.
-
Completely seized → Drill out.
Always start with the least aggressive method before move to more invasive techniques.
Final Thoughts
The process of removing stripped screws on metal requires patience and proper tool use coupled with restraint. Excess torque leads to greater damage and damage to adjacent metal, it should be avoided.
The first step is to improve grip, then lubricate, controlled impact, and extraction tools may be necessary. The last resort in preservation of thread integrity should always be drilling.
Also Read:

Engineer Hassan is a seasoned Mechanical Engineer specializing in hardware, fasteners, tools, and precision mechanical components. With over 16 years of hands-on experience in mechanical design, assembly, and maintenance, he creates detailed size charts, installation guides, and tool selection resources. His content focuses on accuracy, safety, and practical engineering solutions, helping professionals, technicians, students, and DIY enthusiasts make reliable decisions in mechanical projects.