In designing threads on bolts, screws or any other rod, it is extremely important to have the appropriate tools at hand and understand their size. Any workshop, garage or DIY toolkit will not be complete without tap and die sets.
You could be working on a machine repair, you could be creating personalized fasteners, or you could be doing a clean-up of damaged threads, but you have the knowledge of the tap and die sizes, which makes your work precise, long-lasting, and efficient.
Here, we shall discuss all you should know about tap and die size charts, types of threading, and methods of using these tools and how to find the appropriate tool to do the job in this guide.
What Are Taps and Dies?
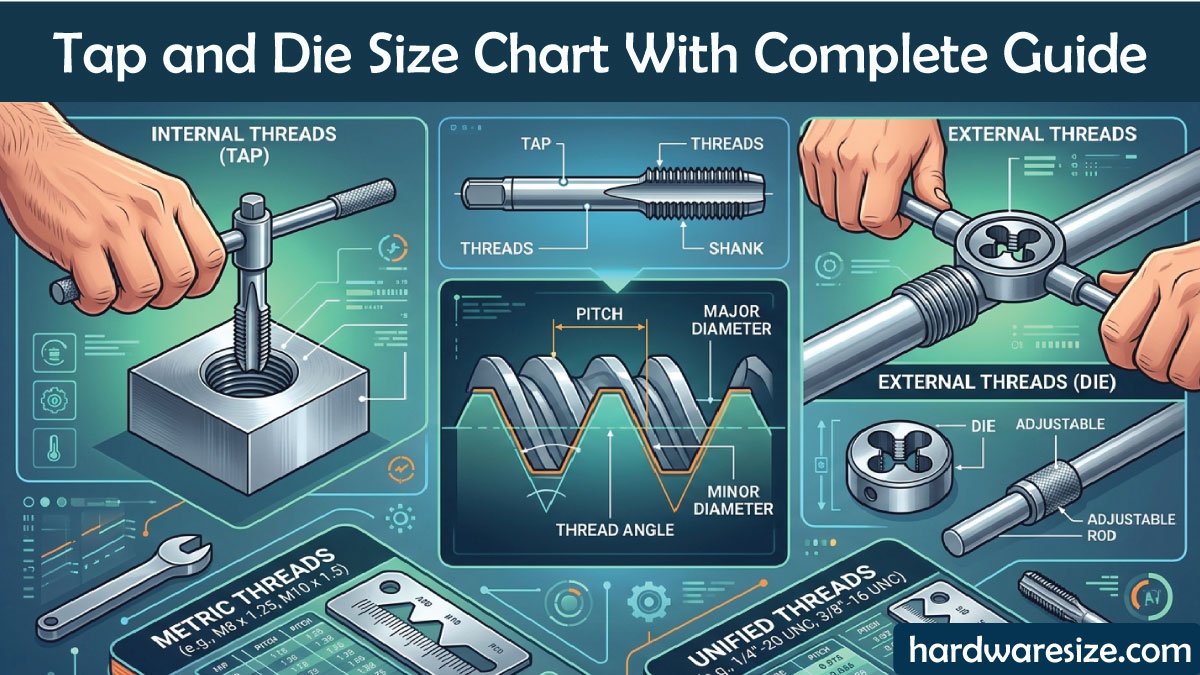
Sizes Before going further, it is good to have an idea of what these tools can do. Taps and dies are special cutting tools to form internal and external threads to offer robust, precise and repeatable connections in metal, plastic, or other media.
Tap
A tap has been developed to slice internal threads in an existing pre-drilled hole to create a female thread copying a bolt or a screw. There are various taps such as taper, plug, and bottoming taps in order to meet the threading requirements.
Die
A die cuts external threads on rods, bolts, or shafts, produce male threads that can fit into nuts or tapped holes. Dies can be round, hexagonal, or adjustable depend on the thread requirements and project precision.
Combined Use
Taps and dies can be combined to make full threaded connections to be repaired, modified or made to custom fabrications. The knowledge of their operation will help you have your fasteners in the proper order and will work under stress or load.
Types of Threads
There are Threads that are categorized by their shape, pitch and standard. Selection of the right type is essential to be compatible with fasteners and nuts so as to have secure connections in automotive, machinery, electronics, or plumbing.
1- Metric Threads
Metric threads are measured in millimeters and are common in the world especially in Europe and Asia. Example: M6 × 1 indicates a 6mm diameter rod with a 1mm thread pitch. Metric threads are precise and easy to standardize.
2- Unified Threads (UNC/UNF)
The united threads are prevalent in the United States. UNC (Unified Coarse) has fewer threads per inch, making it stronger in softer materials, while UNF (Unified Fine) has more threads per inch for tighter, precise connections. Example: 1/4-20 UNC.
3- Pipe Threads
Pipe threads are meant to be plumbing or fluid in nature. These threads are usually tapered, and screwed together to produce a tight seal which does not leak. Pipe threads are standardized either in NPT, BSP or region-specific standards.
Tap Types and Their Uses
Taps that are cut differently and used in different purposes. The right tap would be used to achieve a smooth threading, less breakage of tools and good strong and accurate cutting threads in most materials.
1- Taper Tap
Taper taps Taper taps are used in initiating threading in a new hole. they possess a smooth cutting edge, and have a gradually cutting effect of introducing the thread, and reducing the chances of binding, or breaking, particularly in blind holes, or hard metals.
2- Plug Tap
Plug taps apply as a follow up of taper taps and can thread most holes. They come in through-holes, and have a common application of partially threaded blind holes, which offer uniform and accurate internal threads.
3- Bottoming Tap
Bottoming taps are used to cut threads near the bottom of the blind holes. They can be used to complete threads where the taper and plug taps are not able to reach to provide a full threaded hole to allow full engagement of a fastener.
Also Read:
👉 Discover all screwdriver types in this beginner-friendly guide. Learn their uses, features, and how to choose the right one for any task. Read the full post to build your tool knowledge and work with confidence!
Die Types and Their Uses
Dies are special tools that cut external threads on either a rod, bolt or shaft. The type of die selected will give accurate threading, minimized wear and good, accurate male threads to undertake dependable fastener connections.
1- Solid Die
A fixed-size tool that is utilized to do accurate threading is known as a solid die. It is traditionally used to make new threads or to repair damaged ones, is predictable in general machining, automotive or workshop work.
2- Adjustable Die
The adjustable dies may be adjusted slightly to correct slight flaws in the thread. They can be used to fix or adjust threads and threads can be tightened or loosened by them to fit between the threaded rod and the matching nut.
3- Round Die
The most common Round dies that is applicable in general threading. They need a die stock holder to align and cut quite well, and are applicable to rods, bolts and medium-precision external threads.
Use Dies Effectively
Threading with a die, always apply cutting oil to create less friction, heat, and wear of the tool. Effective lubrication leads to better cutting, increased life of tool and better external thread on any kind of rods and bolts.
How to Read Tap and Die Sizes
Tap and die size chart assists you in matching the bolts, screws and rods with their appropriate threading tools. It is very important to understand the chart.
Metric Taps and Dies
Metric sizes are defined by diameter × pitch (mm). For example:
| Tap/Die Size | Diameter (mm) | Pitch (mm) | Hole Size (Drill) |
|---|---|---|---|
| M3 | 3 | 0.5 | 2.5 |
| M4 | 4 | 0.7 | 3.3 |
| M5 | 5 | 0.8 | 4.2 |
| M6 | 6 | 1.0 | 5.0 |
| M8 | 8 | 1.25 | 6.75 |
| M10 | 10 | 1.5 | 8.5 |
| M12 | 12 | 1.75 | 10.2 |
Tip: The drill size in the chart is the size of the hole you should drill before tapping. Always check the pitch to avoid loose or tight threads.
Unified Thread (UNC/UNF)
| Tap/Die Size | Diameter (inches) | TPI (Threads Per Inch) | Drill Size (inches) |
|---|---|---|---|
| 1/4-20 UNC | 1/4 | 20 | 13/64 |
| 5/16-18 UNC | 5/16 | 18 | 27/64 |
| 3/8-16 UNC | 3/8 | 16 | 5/16 |
| 1/2-13 UNC | 1/2 | 13 | 27/64 |
| 5/8-11 UNC | 5/8 | 11 | 33/64 |
Tip: For UNF (fine) threads, the drill size is slightly larger than for coarse threads due to tighter threading. Always refer to a reliable chart.
Tap and Die Sizes Pdf
Download our Tap and Die Sizes PDF to get a complete, easy-to-use reference chart for metric, UNC, and UNF threads. Perfect for workshops, DIY projects, and professional use, it helps you select the right tap or die quickly.
Also Read:
👉 Discover the bearing size chart with a complete guide to dimensions, types, and selection tips. Learn how to choose the right bearing for smooth performance. Read the full post to improve your mechanical knowledge!
How to Use a Tap: Step-by-Step
It is important to use a tap properly in making internal threads that are accurate. These instructions are followed to cut thread in holes clean and precise without damaging the tools or work piece, resulting in long lasting and professional quality work.
1- Drill the Hole
Choose the right size of the drill using the tap and die chart. Be careful when drilling, maintain straight line drill. Make sure that the hole is drilled to the proper depth and there is no debris in the hole that will cause it to be threaded badly.
2- Apply Cutting Oil
Rub cutting oil with plenty on the tap and in the hole. This will minimize friction and heat accumulation, extend the tool life and serve to create smooth and precise threads particularly when using hard metal, stainless steel or thicker material.
3- Start Tapping
Place the taper tap into the hole that is drilled and turn it clockwise. Maintain the tap at a vertical position in order to prevent angled threads or damage of the tool. A smooth, uniform movement guarantees uniform and quality threading of the hole.
4- Reverse Occasionally
When rotated clockwise, only a little counterclockwise on the tap. This divides metal chips, eliminates clogging and decreases the possibility of tap breakage, particularly in deep or hard material holes. Backing frequently produces clean and clear internal threads.
5- Finish the Thread
After the required depth of the thread is obtained work towards winding off the tap. Wipe the threads with brush or compressed air to get rid of metal shavings. Test the threads to be smooth and functional so that they fit well with the respective bolt or screw.
Pro Tip: For stainless steel or hard metals, use slower tapping speeds and generous cutting oil. This reduces heat buildup, prevents tap breakage, and ensures high-quality threads that are accurate and durable.
Also Read:
👉 Explore the Allen key size chart with complete metric and SAE details. Learn exact sizes, conversions, and how to choose the right hex key. Read the full post to avoid mistakes and work with confidence!
How to Use a Die: Step-by-Step
A die is a tool that should be utilized properly to produce external threads on a rod or a bolt. All these steps are certain to guarantee smooth, accurate threading, tool life reduction and creation of strong threads that perfectly fit into matching nuts or tapped holes.
1- Prepare the Rod
Before threading, ensure that the rod is smooth, clean and well chamfered at the end. The chamfered edge ensures that the die is smooth at the beginning, minimizes chances of misalignment, and the threads are not damaged when cutting.
2- Mount the Die
Place the die in a die stock holder making sure that it is centered and stable. Correct mounting will ensure straight and even threads and ensure even cutting which may weaken and compromise the strength and fitting of the threaded rod or bolt.
3- Apply Cutting Oil
Before threading, use cutting oil generously on the rod and the die. Lubrication minimizes friction and heat, eases threading, wears the die and produces clean and uniform threads throughout the length of the rod.
4- Start Threading
Hold the die on the end of the rod and turn it clockwise keeping it perfectly in position. Keep the die straight ensures uniform threads, prevents tool binding, and produces precise, durable male threads for fasteners.
5- Reverse Occasionally
After every few rotations, turn the die slightly counterclockwise to break metal chips. This will avoid clogging, lessen the pressure on the die, and permit the cutting to be made easier, particularly in threading long rods or in harder materials.
6- Finish the Thread
When all the length of the rod is threaded remove the die with great care. Clean up the threads using brush or cloth to get off debris and check on the threads to be smooth and accurate then test using a nut.
Pro Tip: Always test the threaded rod with a matching nut to ensure proper fit. Slight adjustments may be necessary with an adjustable die, and using cutting oil during testing maintains smooth operation and thread integrity.
Common Mistakes to Avoid
It is necessary to know the typical mistakes that may happen during the usage of taps and dies in order to avoid the damages of the tool and the appearance of low-quality threads. These errors can be avoided and guarantee proper long lasting threads, least costs on repairing a thread and more efficiency in any venture, be it DIY or professional machining.
Wrong Drill Size: Drilling too small or too large makes threading difficult or loose.
Skipping Lubrication: Metal friction generates heat, causing tap or die breakage.
Incorrect Tap Type: Using a bottoming tap first in a blind hole may cause tap breakage.
Excessive Force: Let the tool cut at its own pace; forcing it can ruin threads or break tools.
Tap and Die Set Sizes
Tap and die sets are available in workshop size and they are a wide variety of the project. Being aware of your set sizes allows you to select the appropriate tool in no time, regardless of whether one is working on an automotive, industrial or electronics project.
Metric Set: M3–M12 (common workshop sizes)
UNC/UNF Set: 1/4–1/2 inch (US standard)
Miniature Set: For electronics and precision projects (M1.6–M2.5)
Tip: Invest in high-quality HSS (High-Speed Steel) taps and dies for longevity and better performance.
Also Read:
👉 Understand wrench sizes with helpful tips, size charts, and selection advice. Learn how to choose the right wrench for every task and avoid mistakes. Read the full post to improve your tool knowledge and efficiency!
Choose the Right Tap and Die
Proper choice of tap and die set is a guarantee of accuracy and efficiency. Purchase thread standards, material, usage and set completeness to ensure that you derive the maximum out of your tools and to ensure consistent and high-quality professional threads.
Thread Standard: Metric or Unified.
Material to Thread: Softer metals like aluminum need different cutting oil than hardened steel.
Usage Frequency: Professional workshops require durable HSS or even cobalt tools.
Set Completeness: Ensure the set covers common sizes you’ll use frequently.
Maintenance Tips
Taps and dies should be maintained properly so as to prolong their life and allow correct and smooth threading. Regular cleaning, lubrication and storage of tools prevents any damages and ensures that they are in use and this will save time and money that would otherwise be spent on repair and replacement.
Clean After Use: Remove metal shavings to prevent corrosion.
Use Cutting Oil: Protects threads and extends tool life.
Store Properly: Keep in a dry, organized toolbox to prevent rust.
Check Wear: Replace dull taps or dies to maintain thread accuracy.
Conclusion
Threading Bolts, rods and holes can also be done precisely with 14- Tap and die tools. Knowledge of the tap and die sizes, types of threading and usage makes threads precise and long life. Be it a DIYer or a professional mechanic, having a well-organized set with size charts is going to save you time, make fewer mistakes and improve the quality of your projects.
By follow this guide and refer to the tap and die size charts, you will confidently handle threading tasks, from repairing a stripped bolt to create the custom fasteners for machinery.
Pro Tip: Always double-check the required thread standard, drill size, and tap type before starting any project. A little preparation ensures perfect threads every time.

Engineer Hassan is a Mechanical Engineer with over 16 years of hands-on experience in mechanical hardware, fasteners, bolts, screws, nuts, washers, and related mechanical components. He has extensive expertise in selecting, measuring, and installing hardware, ensuring accuracy, safety, and reliability in every project.
Through Hardware Size, he provides detailed size charts, installation guides, and technical tutorials, helping engineers, technicians, students, and DIY enthusiasts solve practical hardware problems with confidence.