Measuring fasteners correctly is one of the most important skills in any workshop, garage, or DIY setup. Whether you are replacing a missing bolt, matching a screw, or working on machinery, accurate measurement ensures a proper fit, safety, and long-term reliability.
But what if you do not have calipers, thread gauges, or precision tools?
The good news is—you can still measure fasteners accurately using simple, everyday items. In this guide, you will learn how to measure fasteners without specialized tools, using practical methods that are easy, reliable, and beginner-friendly.
Why Accurate Fastener Measurement Matters
Accurate fastener measurement is essential for ensuring strong, safe, and reliable connections in any project. It helps avoid fitting issues, reduces damage risks, and improves overall efficiency when selecting or replacing bolts, screws, and other hardware components.
Before jumping into methods, it’s important to understand why this matters:
- Prevents loose or weak connections
- Avoids thread damage
- Ensures compatibility with nuts and holes
- Saves time and money on wrong purchases
Even a small measurement mistake can lead to poor performance or failure in mechanical applications.
Types of Fasteners You May Need to Measure

Before taking any measurements, it is important to identify the type of fastener you are working with. Each fastener has a slightly different structure and purpose, which affects how it should be measured. Knowing these differences helps avoid errors, ensures proper fit, and improves overall mechanical performance in any project.
1- Bolts
Bolts are externally threaded fasteners typically used with nuts to secure two or more components together. They usually have a defined head and require accurate measurement of diameter, length, and thread pitch. Proper bolt measurement ensures strong clamping force and prevents joint failure in structural or mechanical assemblies.
2- Screws
Screws are similar to bolts but are often used without nuts and can thread directly into materials like wood or metal. Measuring screws requires attention to length, diameter, and thread type. Accurate sizing is essential to avoid stripping threads, damaging materials, or creating weak connections in applications.
3- Nuts
Nuts are internally threaded fasteners designed to pair with bolts or threaded rods. When measuring nuts, focus on internal diameter and thread pitch. Proper sizing ensures compatibility with bolts, prevents loosening, and maintains the strength of the connection, especially in load-bearing or vibration-prone environments.
4- Studs
Studs are threaded rods without a head, often threaded on both ends or along their full length. They are commonly used in engines and heavy machinery. Measuring studs involves checking total length, diameter, and thread pitch to ensure correct alignment and secure fastening in critical assemblies.
5- Washers
Washers are flat, circular components placed between a fastener head and the surface being secured. They help distribute load and reduce wear. Measuring washers involves inner diameter, outer diameter, and thickness. Correct sizing improves stability, prevents surface damage, and enhances overall fastening performance.
Key Measurements You Need to Know
To measure any fastener correctly, you must understand the key dimensions that define its size and compatibility. These measurements are essential for selecting the right fastener, ensuring proper fit, and avoiding mechanical issues. Even small inaccuracies can lead to poor performance, loosened joints, or damaged threads over time.
1. Diameter
The diameter refers to the thickness of the fastener’s shaft or body. It is one of the most critical measurements because it determines how well the fastener fits into a hole or nut. An incorrect diameter can cause loose connections or excessive stress, leading to potential failure.
2. Length
Length is the measurement from the fastener head to its end, though this can vary depending on the fastener type. For some screws, the head is included, while for bolts, it is not. Accurate length ensures proper engagement, strength, and alignment in assembled components.
3. Thread Pitch
Thread pitch is the distance between two adjacent threads. It determines how tightly the fastener will engage with a nut or threaded hole. Incorrect pitch can cause mismatching, cross-threading, or weak connections, making it essential to measure this dimension carefully for proper compatibility.
4. Head Size
Head size refers to the width across the fastener head, which determines the correct wrench or socket needed for installation. Using the wrong size tool can damage the fastener head. Accurate measurement ensures efficient tightening, proper torque application, and safe assembly in mechanical work.
Tools You Can Use Instead of Specialized Equipment
You don’t always need professional tools like calipers or gauges to measure fasteners accurately. In many cases, simple household items can do the job effectively. These alternatives are easy to find, cost nothing, and can still give you reliable measurements when used carefully and with attention to detail.
1- Ruler (Metric or Inch Scale)
A standard ruler is one of the easiest tools for measuring fasteners. You can use it to check length, diameter, and even approximate thread spacing. Make sure to align the fastener properly with the scale and read measurements carefully to avoid small but important errors.
2- Measuring Tape
A measuring tape is useful when dealing with longer bolts or studs. It provides flexibility and can measure both metric and imperial units. While not as precise as a caliper, it works well for general measurements, especially when high precision is not critical for the application.
3- Coin (for Comparison)
Coins can be used as a quick reference for estimating size when no measuring tool is available. By comparing a fastener to a known coin diameter, you can get a rough idea of its size. This method is helpful for quick checks but not suitable for precise measurements.
4- Paper and Pen
Using paper and a pen, you can trace the outline of a fastener or mark its length and diameter. This simple method allows you to compare sizes later or take notes for purchasing replacements. It is especially useful when you need to remember measurements without tools.
5- Smartphone (Zoom or Measurement Apps)
A smartphone can act as a handy measuring aid using zoom features or measurement apps. You can take close-up photos to examine threads or use apps that estimate dimensions. While not perfectly accurate, this method is convenient for quick assessments and visual comparisons.
6- Thread Matching with Existing Nuts
One of the most practical methods is to match the fastener with an existing nut. By testing different nuts, you can identify the correct thread size and pitch. If it fits smoothly without resistance, it’s likely the right match, helping you avoid thread damage or mismatch issues.
Step-by-Step: How to Measure Fasteners Without Tools
Measuring fasteners without specialized tools may seem difficult at first, but with simple household items and careful observation, you can achieve accurate results. This step-by-step guide breaks the process into easy methods so you can confidently measure diameter, length, thread pitch, and head size without expensive equipment.
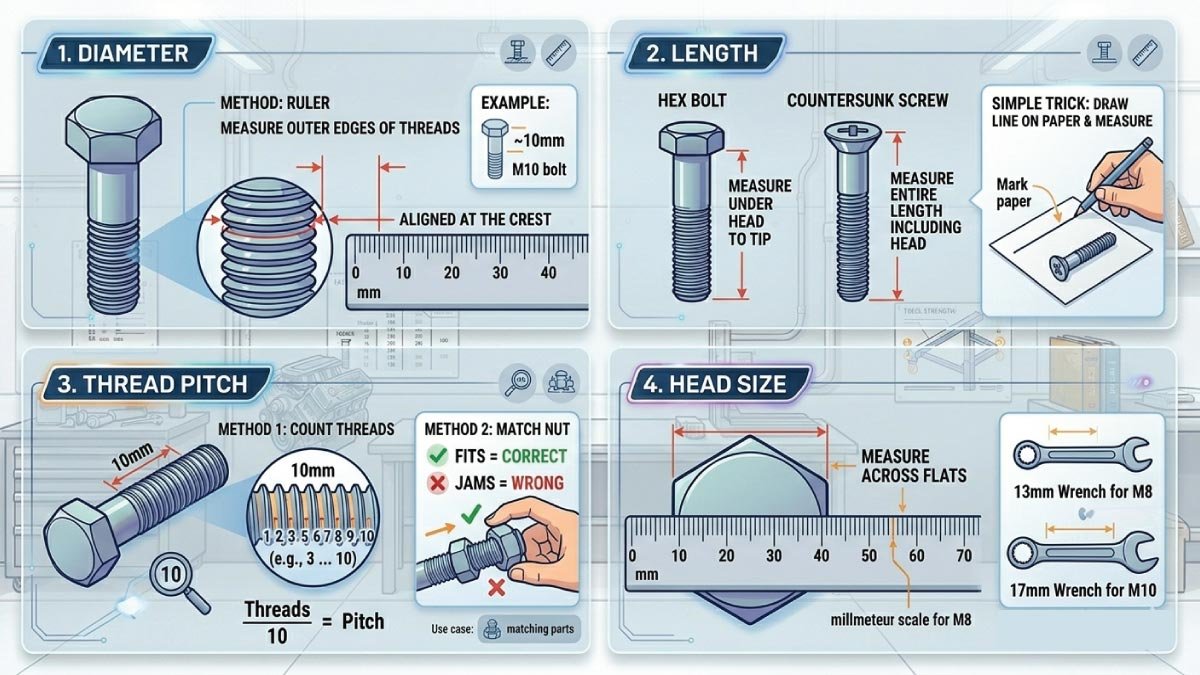
Step 1: Measure the Diameter
The diameter is one of the most important measurements because it determines compatibility with nuts, holes, and threaded components. Even without calipers, you can estimate it accurately using a ruler. Focus on measuring the outermost edges of the threads, not the inner core, to get the correct nominal size.
Method 1: Using a Ruler
- Place the fastener on a flat surface
- Align the ruler across the threaded part
- Measure the outer edges of the threads
👉 Tip: Always measure the widest part (crest of threads)
Example: If it measures around 10 mm, it is likely an M10 bolt
Step 2: Measure the Length
Fastener length varies depending on the type, so understanding where to start and end the measurement is essential. Incorrect length measurement can cause improper fitting or weak connections. By following the correct reference points for each fastener type, you can ensure accuracy even with basic tools like a ruler or marked paper.
This depends on the fastener type:
For Bolts (Hex Head, Pan Head, etc.)
- Measure from under the head to the tip
For Countersunk Screws
- Measure the entire length including the head
Simple Trick: Place the fastener next to a ruler or draw a line on paper and measure it.
Step 3: Identify Thread Pitch Without a Gauge
Thread pitch defines how tightly threads are spaced and is crucial for proper fitting. Without a thread gauge, you can still estimate pitch using simple counting or matching methods. These techniques require patience and attention to detail but can give surprisingly accurate results when done carefully.
Thread pitch is tricky without tools, but here are easy methods:
Method 1: Count Threads
- Count how many threads are in 10 mm length
- Divide by 10 to get pitch
Example: 10 threads in 10 mm → Pitch = 1.0 mm
Method 2: Match with a Known Nut
- Try screwing into a known nut
- If it fits smoothly → correct pitch
- If it jams → wrong pitch
Step 4: Measure Head Size
The head size helps identify the correct wrench or spanner required for installation or removal. Measuring across the flat sides of the head (not corners) ensures you get the correct dimension. Even with a simple ruler, this method provides a reliable estimate for most standard fasteners.
Use a ruler to measure across flats:
- Place the fastener head flat
- Measure the width from one flat side to the opposite
Example:
13 mm head usually matches M8 bolt
17 mm head usually matches M10 bolt
Easy DIY Measurement Hacks
If you don’t have professional tools, there are still several clever ways to measure fasteners accurately at home. These simple DIY hacks use everyday items and practical techniques to help you estimate size, length, and thread details without spending money on specialized equipment.
1. Use a Coin for Reference
Coins are made with standard diameters, which makes them useful as a quick comparison tool. By placing a fastener next to a coin, you can visually estimate its size. This method is especially helpful when you need a rough diameter measurement in situations where precision tools are not available.
- Coins have standard sizes. Compare the fastener diameter with a coin to estimate size.
2. Use Paper Marking Method
This method is simple and surprisingly accurate for measuring length. By marking the start and end points of a fastener on paper, you create a clear reference that can easily be measured with a ruler. It works well when holding the fastener steady is difficult during direct measurement.
- Place fastener on paper
- Mark start and end points
- Measure using a ruler
3. Use Smartphone Zoom
Modern smartphones can act as powerful measurement aids. By taking a close-up photo, you can zoom in to clearly see thread spacing, count threads, or compare proportions. This method improves visibility and helps reduce errors when dealing with small or detailed fasteners.
- Take a close-up photo and zoom in to count threads or compare scale.
4. Use Existing Hardware
Using already available hardware is one of the most reliable and practical methods. Matching your fastener with known bolts or nuts helps you quickly identify the correct size and thread type. This approach is commonly used in workshops when measuring tools are not immediately accessible.
Match your fastener with:
-
- Old bolts
- Nuts
- Pre-labeled hardware
This is one of the most reliable methods.
Common Fastener Size Reference Table
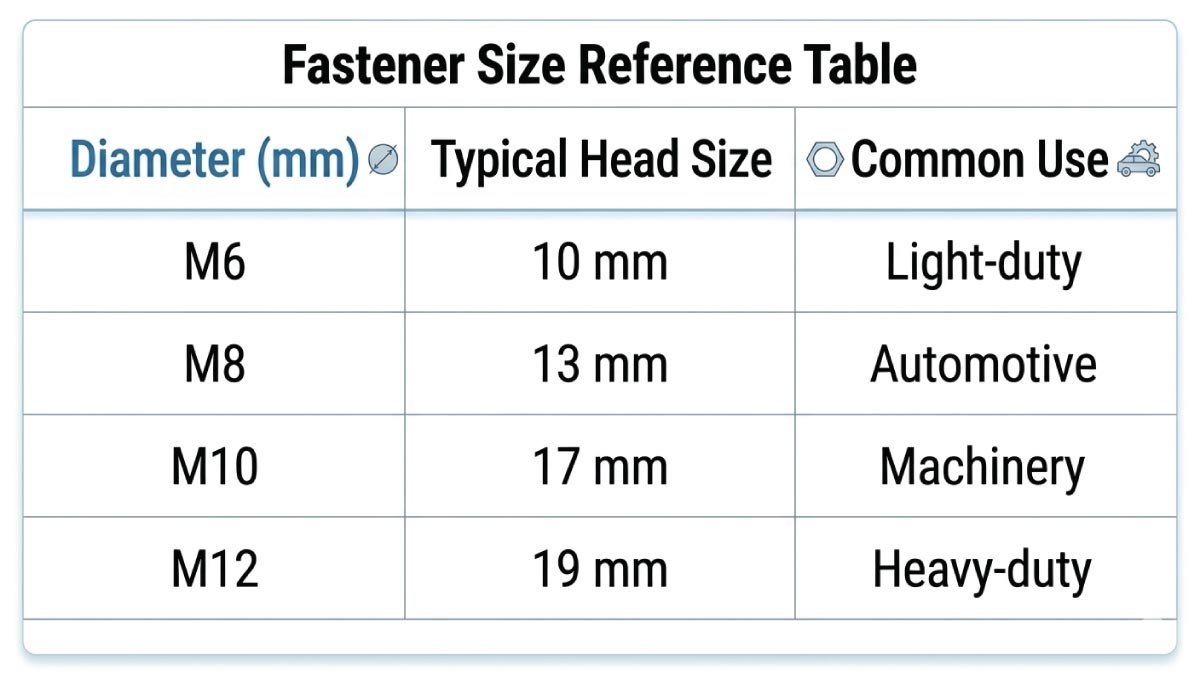
This quick reference table helps you identify common fastener sizes and their typical applications. It gives a general idea of diameter, matching head size, and where each fastener is usually used, making selection easier for both beginners and professionals.
| Diameter (mm) | Typical Head Size | Common Use |
|---|---|---|
| M6 | 10 mm | Light-duty |
| M8 | 13 mm | Automotive |
| M10 | 17 mm | Machinery |
| M12 | 19 mm | Heavy-duty |
🔧 Mechanical Measurement Tools and Their Sizes cover essential instruments like vernier calipers, micrometers, rulers, and gauges used to measure length, diameter, and thickness accurately. This post explains standard tool sizes, their applications, and how to choose the right tool for precise mechanical work, ensuring accuracy, efficiency, and professional-quality results in engineering tasks.
Mistakes to Avoid
Even when measuring fasteners seems simple, small errors can lead to incorrect sizing, poor fit, and even equipment failure. Many beginners make avoidable mistakes that cause delays, extra costs, and damaged components. Paying attention to these common issues helps ensure accurate measurements and better overall results.
❌ Measuring the Wrong Part
One of the most common mistakes is measuring the wrong section of the fastener. You should always measure the threaded part or the shaft, not the head unless specifically required. The head size is only for tool selection, while the body determines actual fit and compatibility.
❌ Ignoring Thread Pitch
Thread pitch is often overlooked, but it is just as important as diameter and length. Two bolts may appear identical in size, but if their thread pitch is different, they will not fit properly. Ignoring this detail can lead to cross-threading, weak joints, or complete assembly failure.
❌ Mixing Metric and Imperial
Confusing metric and imperial measurements is a very common and costly mistake. A bolt measured in millimeters may seem close to an inch-based size, but they are not interchangeable. Always confirm the measurement system before selecting or purchasing fasteners to avoid mismatched fittings and wasted materials.
❌ Estimating Without Checking Fit
Relying only on visual estimation can lead to incorrect choices. Even if a fastener looks similar, small differences can affect performance. Whenever possible, always test the fastener with a matching nut or reference part to confirm proper fit and avoid unnecessary rework or mechanical issues.
Practical Example
Let’s understand the full process with a real-life scenario so you can see how simple observations help identify a fastener without professional tools. This example combines diameter, length, and thread estimation into one complete identification method that you can apply in everyday situations.
- You find a bolt and don’t have any measuring tools available
- First, you visually compare the diameter with known references like coins or nearby hardware
- The diameter looks close to 10 mm → Likely M10
- Next, you measure the length using a ruler or paper marking method → 50 mm
- Then you estimate thread pitch by counting threads over a small section
- You count 10 threads in 10 mm → Pitch = 1.0
👉 Final size: M10 × 50 mm (1.0 pitch)
This simple breakdown shows how combining multiple quick methods can still give you a highly accurate result, even without specialized tools.
When You Should Use Proper Tools
DIY measurement techniques are very useful for quick identification and basic work, but they are not always suitable for precision or safety-critical tasks. In many mechanical and engineering applications, even a small error can lead to failure, misalignment, or damage.
You should use proper tools when:
- Working on critical machinery
- Handling high-load applications
- Precision is extremely important
Tools like vernier calipers and thread gauges provide exact accuracy and remove guesswork, ensuring that every fastener fits perfectly and performs safely under pressure.
Pro Tips for Better Accuracy
When measuring fasteners without professional tools, small mistakes can easily lead to incorrect sizing. These simple pro tips help you improve accuracy, reduce confusion, and make your DIY measurements much more reliable in real-world applications.
- Always measure twice
- Use good lighting
- Keep a reference bolt set
- Label your hardware for future use
Final Thoughts
Measuring fasteners without specialized tools may seem difficult at first, but with the right techniques, it becomes simple and reliable.
By using basic tools like a ruler, paper, or even a coin, you can accurately determine diameter, length, and thread pitch. These methods are practical, cost-effective, and perfect for everyday use.
Whether you are working in a garage, workshop, or at home, mastering this skill will save you time, reduce mistakes, and improve your overall efficiency.
📊 Engineering Units Conversion Chart for Projects is a helpful reference for engineers and technicians to quickly convert between metric and imperial units. It simplifies calculations, reduces errors, and improves accuracy in design and construction work. This chart is essential for ensuring consistency, efficiency, and precision in all engineering projects globally.
FAQs:
How to measure fasteners?
To measure fasteners, check three key dimensions: diameter, length, and thread pitch. Use a ruler or compare with known bolts. Measure diameter across threads, length from tip to underside of head, and count threads per mm or inch. These steps ensure correct identification and proper replacement for mechanical applications.
How to measure without a measuring tool?
Without tools, you can compare the fastener with known objects like coins, standard bolts, or nuts. Visual matching helps estimate diameter and length. You can also use printed size charts for reference. While not highly precise, these methods are useful for quick identification in emergencies or basic repair work.
How to identify fastener size?
Fastener size is identified by measuring diameter, length, and thread pitch. Markings on bolt heads may also indicate size. Comparing with standard metric or imperial charts helps confirm accuracy. Identifying these details ensures compatibility with nuts, holes, and assemblies, preventing loose fittings or mechanical failure in applications.
What does M8, M10, M12 mean?
M8, M10, and M12 represent metric bolt sizes. The “M” stands for metric thread system, and the number indicates the nominal diameter in millimeters. For example, M8 means 8 mm diameter, M10 means 10 mm, and M12 means 12 mm. These standards help ensure uniform fastening worldwide.
What size is M10 in mm?
M10 refers to a metric bolt with a nominal diameter of 10 millimeters. The actual threaded diameter is approximately 10 mm, though slight variations may exist depending on manufacturing tolerance. It is a commonly used fastener size in automotive, construction, and machinery applications due to its strength and versatility.
How to select fastener size?
To select the correct fastener size, consider material thickness, load requirements, and hole diameter. Match diameter and length with the application and ensure proper thread compatibility. Check whether metric or imperial system is required. Always choose a slightly stronger fastener for safety, especially in load-bearing or mechanical structures.
How to calculate fastener size?
Fastener size is calculated by measuring three main parameters: diameter, length, and thread pitch. The diameter is measured across the threaded section, length from tip to underside of the head, and pitch is the distance between threads. Matching these values with standard metric or imperial charts ensures correct size selection.
What is the meaning of M10-1.0 × 20?
M10-1.0 × 20 is a metric fastener specification. “M10” means 10 mm nominal diameter, “1.0” is the thread pitch (1.0 mm between threads), and “20” is the length in millimeters. This notation helps identify exact bolt size for proper fitting in mechanical and engineering applications.
What is the 3 thread rule?
The 3 thread rule means at least three full threads of a fastener should be visible or engaged beyond the nut for proper strength and safety. It ensures secure fastening, prevents loosening, and confirms full thread engagement, especially in structural, mechanical, and load-bearing applications.

Engineer Hassan is a Mechanical Engineer with 16+ years of hands-on experience in mechanical hardware, fasteners, and workshop tools. He focuses on size selection, thread identification, and measurement, helping users choose the correct components with accuracy and safety.