
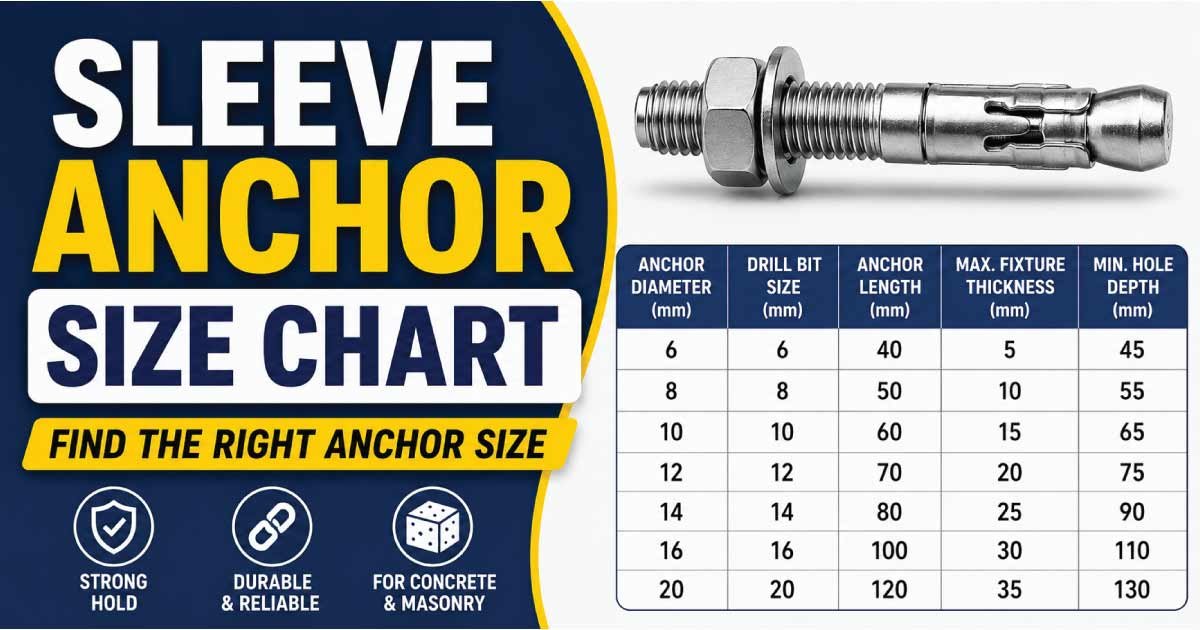
A sleeve anchor is a mechanical fastener used to attach materials to concrete, brick, block, and other masonry substrates. It consists of a threaded bolt or stud, an expansion sleeve, a nut and washer, and sometimes an integral cone. When the fastener is tightened, the cone pulls into the sleeve and expands it against the sides of the drilled hole.
Choosing the correct sleeve anchor size is important for creating a secure connection. The anchor must have the correct diameter, length, embedment depth, hole size, and load capacity for the application.
Sleeve anchors are widely used for attaching brackets, handrails, shelves, signs, electrical equipment, machinery, fixtures, and other components to masonry. Their relatively simple installation makes them popular for both construction and maintenance work.
This complete guide explains sleeve anchor sizes, dimensions, types, hole requirements, embedment, applications, installation, load considerations, and how to select the correct anchor.
Sleeve Anchor Size Chart
The following chart provides common sleeve anchor sizes and typical application information. Exact dimensions and allowable loads vary by manufacturer, anchor design, base material, and installation conditions, so always verify the manufacturer’s technical specifications for structural or safety-critical applications.
| Sleeve Anchor Diameter | Common Lengths | Typical Hole Diameter | Typical Applications |
|---|---|---|---|
| 1/4 in | 1-1/2–4 in | 1/4 in | Light fixtures, small brackets |
| 5/16 in | 1-1/2–5 in | 5/16 in | Shelves, light equipment |
| 3/8 in | 1-1/2–6 in | 3/8 in | General construction |
| 1/2 in | 2–8 in | 1/2 in | Heavy brackets, equipment |
| 5/8 in | 3–10 in | 5/8 in | Heavy-duty fixtures |
| 3/4 in | 4–12 in | 3/4 in | Large equipment and structural attachments |
These are common nominal sizes rather than universal specifications. Some manufacturers offer additional diameters, lengths, head styles, and specialized sleeve-anchor configurations.
What Is a Sleeve Anchor?
A sleeve anchor is an expansion anchor designed for masonry and concrete applications.
Its basic components normally include:
- Threaded stud or bolt
- Expansion sleeve
- Expanding cone
- Nut
- Washer
When the nut is tightened, the threaded stud pulls the cone into the expansion sleeve. The sleeve expands outward and presses against the inside surface of the drilled hole.
This mechanical expansion creates friction and interlock between the anchor and the base material.
Sleeve anchors are commonly installed in:
- Concrete
- Brick
- Concrete block
- Masonry
- Solid stone in suitable applications
The suitability of a sleeve anchor depends heavily on the quality and condition of the base material.
Sleeve Anchor Dimensions Explained
Several dimensions are important when selecting a sleeve anchor.
Anchor Diameter
Anchor diameter refers to the nominal diameter of the expansion sleeve or threaded anchor assembly.
Common sizes include:
- 1/4 inch
- 5/16 inch
- 3/8 inch
- 1/2 inch
- 5/8 inch
- 3/4 inch
A larger diameter does not automatically mean a higher allowable load because capacity also depends on embedment, concrete strength, edge distance, spacing, and the specific anchor design.
Anchor Length
Anchor length is measured from the end of the anchor to the bearing surface or head, depending on the anchor configuration.
The required length depends on:
- Fixture thickness
- Washer and nut arrangement
- Required embedment
- Base material
- Manufacturer requirements
Hole Diameter
The drilled hole normally matches the nominal anchor diameter for standard sleeve anchors.
For example, a typical 1/2-inch sleeve anchor uses a 1/2-inch drilled hole.
Always follow the manufacturer’s specified drill diameter rather than assuming all anchors use identical requirements.
Embedment Depth
Embedment is the depth of the anchor that is properly engaged inside the base material.
Adequate embedment is critical for achieving the intended holding capacity.
A longer anchor does not necessarily provide more capacity if it is not installed to the required effective embedment.
How Sleeve Anchors Work
Sleeve anchors use mechanical expansion to grip the substrate.
Step 1: Drill the Hole
A hole is drilled into the concrete or masonry using the specified drill bit diameter.
The hole must be deep enough to accommodate the required anchor embedment and installation clearance.
Step 2: Clean the Hole
Dust and drilling debris should be removed according to the anchor manufacturer’s installation instructions.
A contaminated or improperly prepared hole can affect anchor performance.
Step 3: Insert the Anchor
The sleeve anchor is inserted through the fixture and into the drilled hole.
The washer and nut should be positioned correctly.
Step 4: Tighten the Nut
As the nut is tightened, the threaded portion pulls the expansion cone into the sleeve.
The sleeve expands against the walls of the hole.
Step 5: Check the Installation
Verify that the fixture is properly seated and the anchor has been tightened according to the manufacturer’s specified installation procedure.
Sleeve Anchor Size Selection Guide
Selecting the correct sleeve anchor involves several considerations.
1. Identify the Base Material
Determine whether the anchor will be installed in:
- Solid concrete
- Lightweight concrete
- Concrete block
- Brick
- Other masonry
Not every sleeve anchor is approved for every substrate.
2. Determine the Fixture Thickness
Measure the thickness of the material being attached.
The anchor must be long enough to pass through the fixture while providing the required embedment.
3. Select the Anchor Diameter
Choose a diameter suitable for the expected load and manufacturer’s requirements.
Small anchors may be sufficient for light fixtures, while heavier applications may require larger anchors.
4. Check Embedment
Make sure sufficient embedment can be achieved without interfering with reinforcement, voids, or the opposite side of the substrate.
5. Check Edge Distance
Avoid positioning an expansion anchor too close to an edge unless the manufacturer’s specifications specifically permit it.
Expansion forces can contribute to cracking or breakout when an anchor is installed too close to an edge.
6. Check Anchor Spacing
When multiple sleeve anchors are used, maintain the required spacing between anchors.
Closely spaced anchors can interact and reduce their effective capacity.
Common Sleeve Anchor Sizes and Applications
Different sizes are suited to different levels of loading and fixture requirements.
1/4-Inch Sleeve Anchors
1/4-inch anchors are commonly used for relatively light-duty applications.
Typical uses include:
- Small brackets
- Cable supports
- Light fixtures
- Signs
- Small shelving components
The actual allowable load should always be confirmed from the manufacturer’s data.
5/16-Inch Sleeve Anchors
5/16-inch sleeve anchors provide a step up in diameter and are often used for general-purpose masonry attachment.
Applications can include:
- Light equipment
- Brackets
- Shelves
- Small frames
- Fixtures
3/8-Inch Sleeve Anchors
3/8-inch anchors are widely used for general construction and maintenance applications.
They can be used for:
- Equipment brackets
- Handrails where approved
- Electrical fixtures
- Mechanical supports
- Shelving systems
1/2-Inch Sleeve Anchors
1/2-inch anchors are commonly used where larger fasteners and greater holding capacity are required.
Applications may include:
- Heavy brackets
- Equipment supports
- Machinery fixtures
- Guardrails
- Structural attachments where approved
5/8-Inch and 3/4-Inch Sleeve Anchors
Large sleeve anchors are used for heavier-duty attachment applications.
Potential uses include:
- Heavy equipment
- Large brackets
- Machinery
- Structural fixtures
- Industrial installations
For safety-critical applications, use anchors specifically tested and approved for the intended loading condition.
Sleeve Anchor Length Chart
Anchor diameter and length are separate specifications.
| Anchor Diameter | Common Length Range |
|---|---|
| 1/4 in | 1-1/2–4 in |
| 5/16 in | 1-1/2–5 in |
| 3/8 in | 1-1/2–6 in |
| 1/2 in | 2–8 in |
| 5/8 in | 3–10 in |
| 3/4 in | 4–12 in |
The exact available lengths vary by manufacturer.
When choosing length, account for the fixture thickness and the minimum effective embedment specified for the particular anchor.
Sleeve Anchor vs Wedge Anchor
Sleeve anchors and wedge anchors are both mechanical expansion anchors, but their designs and suitable applications differ.
| Feature | Sleeve Anchor | Wedge Anchor |
|---|---|---|
| Expansion method | Sleeve expands around cone | Wedge expands at anchor base |
| Common substrates | Concrete and masonry | Primarily concrete |
| Installation | Relatively simple | Requires proper concrete installation |
| Typical use | Light to medium attachments | Heavy-duty concrete fastening |
| Available sizes | Small to large | Small to large |
| Brick/block applications | Many designs available | Generally less suitable |
The correct choice should be based on the substrate, load, required approvals, edge distance, and manufacturer’s specifications.
Sleeve Anchor vs Concrete Screw
Sleeve anchors and concrete screws are installed differently.
| Feature | Sleeve Anchor | Concrete Screw |
|---|---|---|
| Fastening principle | Mechanical expansion | Thread cuts into substrate |
| Installation | Insert and tighten | Drive into drilled hole |
| Expansion force | Yes | Generally no expansion sleeve |
| Removal | Usually possible | Usually possible |
| Common use | Fixtures and brackets | General masonry attachment |
| Substrate requirements | Depends on anchor | Depends on screw |
Concrete screws can be convenient for certain applications, while sleeve anchors may be preferred where an expansion anchor is specifically required.
Discover More:
Sleeve Anchor Applications
Sleeve anchors have many uses in construction and maintenance.
Electrical Installations
They can be used to secure suitable:
- Electrical boxes
- Conduit supports
- Cable trays
- Equipment brackets
- Panels
The anchor size and load capacity must be appropriate for the equipment being supported.
Mechanical Equipment
Sleeve anchors can secure brackets and light-to-medium equipment to concrete and masonry.
Shelving and Storage
They are commonly used for suitable shelves, racks, and brackets where the substrate and loading conditions allow.
Railings and Handrails
Sleeve anchors may be used for certain railing and handrail applications, but the anchor must be specifically suitable for the required safety loads and substrate.
Signs and Fixtures
Small sleeve anchors are frequently used to attach signs, fixtures, brackets, and other components to masonry.
Factors That Affect Sleeve Anchor Load Capacity
Anchor diameter is only one factor affecting performance.
Concrete Strength
Stronger concrete can generally provide better anchorage conditions, but the specific anchor’s tested capacity must be used.
Embedment Depth
Insufficient embedment can significantly reduce holding strength.
Edge Distance
An anchor installed too close to an edge may have reduced capacity or increase the risk of concrete breakout.
Anchor Spacing
The distance between anchors can affect how loads are distributed through the substrate.
Load Direction
The anchor may experience:
- Tension
- Shear
- Combined tension and shear
The appropriate allowable load must account for the actual loading condition.
Base Material Condition
Cracked, deteriorated, hollow, or weak masonry can significantly affect anchor performance.
Discover More:
How to Install a Sleeve Anchor Correctly
Correct installation is essential for achieving reliable performance.
Required Tools
Typical installation may require:
- Hammer drill
- Correct masonry drill bit
- Measuring device
- Hammer
- Wrench
- Hole-cleaning equipment
- Safety glasses
Installation Procedure
- Mark the anchor location.
- Check required edge distance and spacing.
- Select the correct drill bit.
- Drill to the specified depth.
- Remove dust and debris.
- Place the fixture over the hole.
- Insert the sleeve anchor.
- Install the washer and nut if required.
- Tighten to the manufacturer’s specified torque.
- Inspect the completed installation.
Do not guess the tightening torque for a safety-critical connection.
Common Sleeve Anchor Installation Mistakes
Several installation errors can reduce anchor performance.
Wrong Hole Diameter
Using an incorrect drill diameter can prevent the sleeve from expanding correctly.
Insufficient Hole Depth
If the hole is too shallow, the anchor may not achieve the required embedment.
Poor Hole Cleaning
Dust can interfere with proper seating and expansion.
Insufficient Tightening
Under-tightening may prevent proper expansion of the sleeve.
Over-Tightening
Excessive torque can damage the anchor, fixture, or substrate.
Incorrect Edge Distance
Installing too close to an edge can increase the risk of cracking or breakout.
Using the Wrong Substrate
An anchor designed for solid concrete should not automatically be used in hollow block or brick.
How to Remove a Sleeve Anchor
Sleeve anchors are generally intended to provide permanent or semi-permanent attachment, but some installations can be removed.
A typical removal approach is:
- Remove the nut and washer.
- Attempt to withdraw the anchor if the design allows it.
- If necessary, drive or cut the exposed portion according to the manufacturer’s recommendations.
- Repair the hole if another anchor will be installed nearby.
Do not reuse a sleeve anchor if its expansion components or threads have been damaged.
Sleeve Anchor Materials and Finishes
Sleeve anchors are available in different materials and coatings.
Zinc-Plated Steel
Zinc-plated steel anchors are commonly used for general indoor applications.
They provide some corrosion resistance but are not automatically suitable for severe outdoor or corrosive environments.
Stainless Steel
Stainless steel sleeve anchors may be selected where improved corrosion resistance is required.
They can be useful in:
- Outdoor environments
- Damp locations
- Coastal environments
- Certain industrial applications
The appropriate stainless grade should be selected based on the exposure conditions.
Corrosion-Resistant Coatings
Special coatings may be available for specific environmental requirements.
Always verify the manufacturer’s suitability rating rather than relying only on the appearance of the coating.
Discover More:
Sleeve Anchor Maintenance and Inspection
Although sleeve anchors generally require little routine maintenance, periodic inspection may be appropriate for exposed or safety-relevant installations.
Check for:
- Loose nuts
- Corrosion
- Cracked concrete
- Damaged masonry
- Movement of the fixture
- Deformation
- Visible anchor damage
If an anchor has become loose or the surrounding substrate has deteriorated, investigate the cause before simply tightening the nut.
Frequently Asked Questions
What size sleeve anchor should I use?
The correct sleeve anchor size depends on the fixture thickness, required embedment, applied load, substrate, edge distance, spacing, and manufacturer’s specifications. Common diameters include 1/4, 5/16, 3/8, 1/2, 5/8, and 3/4 inch. Always select based on the complete installation requirements.
What size hole is needed for a sleeve anchor?
For many standard sleeve anchors, the drilled hole diameter corresponds to the nominal anchor diameter. For example, a 1/2-inch sleeve anchor commonly uses a 1/2-inch hole. However, always follow the manufacturer’s specified drill diameter because designs can vary.
How deep should a sleeve anchor be installed?
The required embedment depth depends on the specific anchor and application. The anchor must achieve the manufacturer’s minimum effective embedment while allowing for fixture thickness and installation requirements. Do not assume that simply using a longer anchor automatically increases load capacity.
Are sleeve anchors suitable for concrete?
Sleeve anchors are commonly designed for use in concrete and certain masonry substrates. However, suitability depends on the specific anchor design and whether the concrete is cracked, uncracked, strong, weak, solid, or otherwise conditioned. Check the manufacturer’s approved substrate and load specifications before installation.
Can sleeve anchors be used in brick?
Some sleeve anchors are suitable for brick and masonry, but not every model is approved for every type of brick. Brick strength, condition, hollow areas, mortar joints, edge distance, and anchor design all affect performance. Use an anchor specifically approved for the particular masonry substrate.
What is the difference between a sleeve anchor and a wedge anchor?
A sleeve anchor expands using a sleeve and cone, while a wedge anchor expands through a wedge mechanism at the embedded end. Sleeve anchors are available for various masonry applications, while wedge anchors are commonly associated with heavy-duty concrete fastening. The appropriate anchor depends on substrate and loading.
Conclusion
A sleeve anchor size chart is a useful starting point for selecting the right mechanical expansion anchor, but diameter and length alone do not determine whether an anchor is suitable.
When choosing a sleeve anchor, consider the anchor diameter, length, hole diameter, effective embedment, fixture thickness, base material, edge distance, anchor spacing, load direction, and environmental conditions.
Small 1/4-inch and 5/16-inch anchors can be useful for lighter fixtures, while 3/8-inch and 1/2-inch sizes are commonly used for general construction and equipment attachment. Larger 5/8-inch and 3/4-inch anchors may be appropriate for heavier applications when supported by the manufacturer’s specifications.
Correct drilling, hole cleaning, anchor placement, and tightening are equally important. For structural or safety-critical applications, never rely solely on a general size chart. Use the manufacturer’s tested load data and installation instructions for the exact anchor being installed.
Selecting the right sleeve anchor size and installing it correctly helps create a secure and dependable connection between fixtures and concrete or masonry.

Engineer Hassan is a Mechanical Engineer with 16+ years of hands-on experience in mechanical hardware, fasteners, and workshop tools. He focuses on size selection, thread identification, and measurement, helping users choose the correct components with accuracy and safety.