
A drive pin is a fastener designed to create a permanent or semi-permanent connection by being driven into a prepared hole or substrate. Unlike conventional screws and bolts, drive pins generally do not require a threaded hole or a nut for installation.
Drive pins are commonly used in construction, concrete fastening, metal fabrication, automotive work, electrical installations, signage, machinery, and general industrial applications. Depending on the design, they can be used to attach brackets, clips, plates, fixtures, labels, and other components.
Choosing the correct drive pin size requires more than selecting a pin based on its diameter. Length, shank diameter, head style, substrate, material thickness, installation method, and required holding strength all need to be considered.
This complete guide explains drive pin sizes, dimensions, types, applications, materials, installation methods, and how to select the correct drive pin for your project.
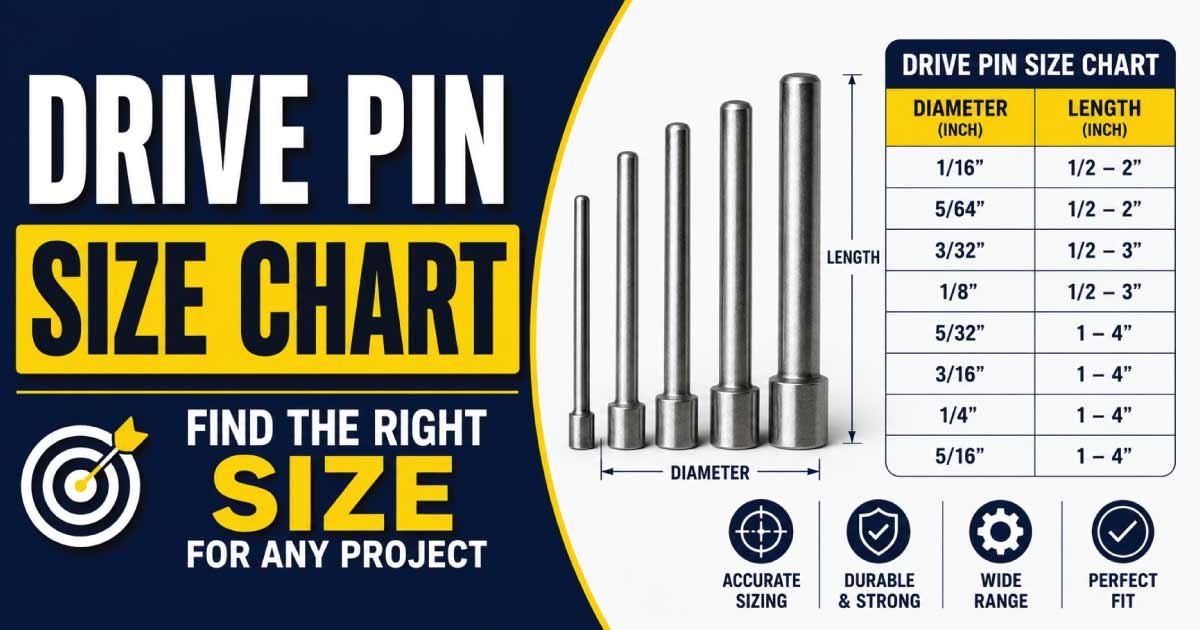
Drive Pin Size Chart
Drive pins are available in different diameters and lengths. The following chart shows common nominal sizes used for general fastening applications.
| Drive Pin Diameter | Common Lengths | Approx. Metric Diameter | Typical Applications |
|---|---|---|---|
| 1/8 in | 1/2–2 in | 3.2 mm | Light-duty fastening |
| 5/32 in | 1/2–2-1/2 in | 4.0 mm | Clips and brackets |
| 3/16 in | 1/2–3 in | 4.8 mm | General fastening |
| 1/4 in | 1/2–4 in | 6.4 mm | Concrete and masonry |
| 5/16 in | 3/4–4 in | 7.9 mm | Medium-duty fastening |
| 3/8 in | 1–5 in | 9.5 mm | Heavy-duty applications |
| 1/2 in | 1–6 in | 12.7 mm | Industrial fastening |
The exact dimensions and available lengths vary according to the drive-pin design and manufacturer. Some specialized pins are produced in additional diameters and lengths.
What Is a Drive Pin?
A drive pin is a fastener that is installed by driving it into a base material or prepared hole rather than turning it into place like a conventional screw.
A basic drive pin may have:
- Head
- Shank
- Point or tip
- Knurled or grooved section
- Threaded or partially threaded section on specialized designs
The exact construction depends on the type of drive pin.
Some drive pins are designed to penetrate relatively soft materials, while others are used with concrete, steel, masonry, or pre-drilled holes.
The primary advantage of a drive pin is its relatively fast installation. In many applications, the pin can be driven into position with a hammer, powder-actuated tool, pneumatic tool, or other approved installation equipment.
Drive Pin Dimensions Explained
Several dimensions determine whether a drive pin is suitable for a particular application.
Pin Diameter
The diameter of the shank is one of the most important measurements.
Common sizes include:
- 1/8 inch
- 5/32 inch
- 3/16 inch
- 1/4 inch
- 5/16 inch
- 3/8 inch
- 1/2 inch
Larger diameters are generally associated with larger or heavier-duty fastening applications, but actual load capacity depends on the complete fastening system.
Pin Length
Drive pin length determines how far the pin can penetrate the base material after passing through the fixture.
Common lengths range from approximately 1/2 inch to several inches.
The correct length should account for:
- Fixture thickness
- Required penetration
- Base material
- Manufacturer requirements
- Installation clearance
Head Diameter
The head provides the bearing surface that holds the attached material against the substrate.
A larger head can distribute pressure over a larger area.
Shank Length
The shank is the portion of the drive pin that enters the base material.
The effective shank length can be different from the overall pin length depending on the head and tip design.
Types of Drive Pins
Drive pins are available in several configurations.
Concrete Drive Pins
Concrete drive pins are designed for fastening components to concrete or masonry.
They can be used for:
- Electrical clips
- Conduit supports
- Brackets
- Metal plates
- Cable supports
- Light-duty fixtures
Some concrete drive pins are installed with powder-actuated tools, while others require pre-drilled holes.
Grooved Drive Pins
Grooved or knurled drive pins have ridges along part of the shank.
These ridges create interference with the hole and help prevent the pin from loosening.
They are often used where a strong mechanical interference fit is required.
Hammer Drive Pins
Hammer drive pins are designed to be installed by striking the exposed head with a hammer or approved installation tool.
They are commonly used for attaching:
- Signs
- Plates
- Brackets
- Fixtures
- Labels
Nail-Type Drive Pins
Some drive pins resemble nails and are designed for rapid fastening into suitable substrates.
They are available in various head and shank configurations.
Drive Rivets
Drive rivets are a related fastener style that uses a pin driven into a body or sleeve.
They are often used for applications requiring quick installation without conventional threaded hardware.
Drive Pin Size Selection Guide
Selecting the correct drive pin starts with understanding the materials being joined.
1. Identify the Base Material
Determine whether the pin will be installed into:
- Concrete
- Brick
- Masonry
- Steel
- Wood
- Composite material
- A pre-drilled metal component
Not every drive pin is suitable for every substrate.
2. Measure Material Thickness
Measure the thickness of the fixture or component being attached.
The pin must be long enough to pass through the fixture while providing the required penetration.
3. Select the Diameter
Choose a pin diameter suitable for the required holding strength and the manufacturer’s specifications.
Do not assume that a larger diameter is automatically better.
4. Check Required Penetration
The pin must have sufficient engagement with the substrate.
Insufficient penetration can reduce holding strength and cause the attachment to loosen.
5. Consider Head Style
Select a head that provides suitable bearing area and clearance.
A large head may be useful for sheet material, while a smaller head may be preferable where appearance or clearance is important.
Drive Pin Length Chart
The following chart provides common length ranges for general drive pins.
| Pin Diameter | Common Length Range | Typical Use |
|---|---|---|
| 1/8 in | 1/2–2 in | Light attachments |
| 5/32 in | 1/2–2-1/2 in | Clips and small brackets |
| 3/16 in | 1/2–3 in | General fastening |
| 1/4 in | 1/2–4 in | Masonry fixtures |
| 5/16 in | 3/4–4 in | Medium-duty attachments |
| 3/8 in | 1–5 in | Heavy-duty fastening |
| 1/2 in | 1–6 in | Industrial applications |
These ranges are for general reference. Exact standard lengths depend on the specific drive-pin product.
How to Measure a Drive Pin
Measuring an existing drive pin can help identify a replacement.
Measure the Diameter
Use a vernier caliper to measure the shank diameter.
Measure the straight section of the shank rather than the head.
Measure Overall Length
Measure from the underside or bearing surface of the head to the end of the pin, depending on the manufacturer’s dimensional convention.
Measure the Head
Record:
- Head diameter
- Head thickness
- Head shape
These measurements can help distinguish similar drive-pin designs.
Check the Tip
Examine whether the pin has:
- Pointed tip
- Blunt end
- Grooved shank
- Knurled section
- Specialized penetrating point
The tip design can indicate the intended installation method and substrate.
Drive Pin vs Screw
Drive pins and screws are both used for fastening, but they work differently.
| Feature | Drive Pin | Screw |
|---|---|---|
| Installation | Driven | Rotated |
| Threads | Usually absent | Present |
| Installation speed | Often fast | Moderate |
| Removal | Often difficult | Usually easier |
| Common use | Permanent/semi-permanent fastening | Removable fastening |
| Tools | Hammer or installation tool | Driver |
| Substrate | Depends on design | Depends on screw |
Drive pins are often preferred when fast installation is more important than easy removal.
Drive Pin vs Rivet
Drive pins and rivets can appear similar but use different fastening principles.
| Feature | Drive Pin | Rivet |
|---|---|---|
| Installation | Driven into material/hole | Deformed during installation |
| Threaded | Usually no | No |
| Typical connection | Interference or penetration | Permanent mechanical joint |
| Installation speed | Fast | Fast |
| Removal | Often destructive | Usually destructive |
| Common materials | Metal, concrete, masonry, wood | Sheet metal and structural assemblies |
The appropriate fastener depends on the materials being joined and the required joint strength.
Discover More:
Drive Pin Applications
Drive pins are used across many industries.
Electrical Installation
Drive pins can be used to secure suitable:
- Conduit clips
- Cable supports
- Electrical brackets
- Junction-box accessories
- Light-duty fixtures
The fastener must be appropriate for the substrate and load.
Construction
Construction workers may use drive pins for:
- Brackets
- Clips
- Signs
- Metal tracks
- Light fixtures
- Temporary or permanent attachments
Concrete Fastening
Specialized concrete drive pins can be used for attaching suitable components to concrete.
The substrate condition and approved load capacity must be considered before installation.
Metal Fabrication
Grooved and interference-fit drive pins are useful for joining or locating metal components.
Automotive Applications
Specialized drive pins can be used in certain automotive assemblies for retaining components, clips, and panels.
Drive Pin Materials
Drive pins are manufactured from materials selected for strength, durability, corrosion resistance, and application requirements.
Carbon Steel
Carbon steel is widely used for general-purpose drive pins.
It provides good strength and is suitable for many indoor applications.
Hardened Steel
Hardened steel drive pins are useful where high strength and resistance to deformation are required.
They are commonly found in demanding mechanical fastening applications.
Stainless Steel
Stainless steel drive pins provide improved corrosion resistance.
They may be appropriate for:
- Outdoor applications
- Damp environments
- Certain industrial environments
- Applications requiring corrosion resistance
The correct stainless steel grade should be selected based on the environmental conditions.
Factors Affecting Drive Pin Holding Strength
Drive pin capacity depends on many factors.
Base Material
Concrete, steel, brick, and wood have different mechanical properties.
A pin suitable for one material may not provide acceptable performance in another.
Pin Diameter
Diameter affects the mechanical strength of the pin and its interaction with the substrate.
Embedment
Greater effective penetration can improve holding performance within the limits of the particular fastener and substrate.
Edge Distance
A drive pin installed too close to the edge of concrete or masonry may cause cracking or breakout.
Spacing
Multiple drive pins installed too close together can interact and reduce the effective capacity of the connection.
Installation Method
The correct installation tool and procedure are essential.
Incorrect driving force can damage the pin or substrate.
How to Install a Drive Pin
Installation depends on the specific type of drive pin.
Hammer-Installed Drive Pins
A basic installation procedure is:
- Position the component.
- Mark the fastening location.
- Drill a pilot hole if required.
- Select the correct drive pin.
- Insert the pin.
- Drive the pin using the recommended tool.
- Check that the component is firmly secured.
Powder-Actuated Drive Pins
Some concrete and steel fastening systems use powder-actuated tools.
These systems require specialized training and strict adherence to the manufacturer’s instructions.
Never substitute an ordinary hammer-driven pin for a powder-actuated fastener or vice versa.
Discover More:
Common Drive Pin Installation Mistakes
Incorrect installation can weaken the connection or damage the substrate.
Avoid these mistakes:
- Using the wrong pin for the substrate
- Choosing an incorrect diameter
- Using insufficient length
- Installing too close to an edge
- Ignoring minimum spacing requirements
- Using excessive driving force
- Failing to clean or prepare the hole
- Using damaged pins
- Reusing pins not designed for reuse
- Ignoring manufacturer installation instructions
For structural or safety-critical fastening, always use an approved fastening system with published performance data.
Drive Pin Safety Tips
Drive-pin installation can involve significant impact or specialized fastening tools.
Follow basic safety practices:
- Wear safety glasses.
- Use appropriate hearing protection when required.
- Inspect the pin before installation.
- Use the manufacturer’s recommended tool.
- Keep hands away from the impact area.
- Check the substrate before driving.
- Avoid fastening into unknown areas where hidden utilities may be present.
- Follow tool-specific safety procedures.
- Do not modify the drive pin.
- Never use a damaged or deformed pin.
Powder-actuated tools require particular care because they can generate substantial driving energy.
How to Choose the Correct Drive Pin
A simple selection process is:
- Identify the base material.
- Measure the fixture thickness.
- Determine the required penetration.
- Select the appropriate pin diameter.
- Choose the correct head style.
- Check edge distance and spacing.
- Confirm the installation method.
- Check environmental conditions.
- Verify load requirements.
- Follow the manufacturer’s specifications.
For example, attaching a lightweight electrical clip to concrete may require a very different drive pin from securing a heavy-duty industrial bracket.
The best drive pin is therefore the one that matches the substrate, fixture, load, dimensions, and installation method.
Discover More:
Frequently Asked Questions
What is a drive pin used for?
A drive pin is used to quickly fasten components to suitable materials such as concrete, masonry, steel, wood, or pre-drilled metal. Depending on its design, it can secure brackets, clips, signs, electrical supports, plates, fixtures, and mechanical components.
What are common drive pin sizes?
Common drive pin diameters include 1/8, 5/32, 3/16, 1/4, 5/16, 3/8, and 1/2 inch. Available lengths vary by design and manufacturer. The correct size depends on the material thickness, substrate, required penetration, load, and specific fastening system.
How do I measure a drive pin?
Measure the shank diameter, overall length, head diameter, head thickness, and tip design. A vernier caliper provides useful accuracy. Also check for markings or manufacturer information because two drive pins with similar dimensions can have different substrate and installation requirements.
Can drive pins be removed?
Some drive pins can be removed, but many are intended for permanent or semi-permanent fastening. Removal may require prying, pulling, cutting, or drilling depending on the design. If the pin is damaged during removal, it should generally be replaced rather than reused.
Can drive pins be used in concrete?
Specialized drive pins are available for concrete fastening. Their suitability depends on the concrete strength, thickness, edge distance, spacing, pin design, and installation method. Always use a drive pin specifically approved for concrete and follow the manufacturer’s installation requirements.
What is the difference between a drive pin and a screw?
A drive pin is generally installed by driving it into the substrate, while a screw is installed by rotating its threads into the material. Drive pins often provide faster installation but can be more difficult to remove. Screws are generally more suitable when future removal is required.
Conclusion
A drive pin size chart provides a useful starting point for selecting the right fastener, but the correct choice depends on much more than diameter and length.
Before selecting a drive pin, consider the pin diameter, length, head style, substrate, fixture thickness, penetration depth, edge distance, spacing, load requirements, and installation method.
Small drive pins are useful for light-duty clips and fixtures, while larger pins are available for heavier mechanical and industrial applications. Specialized versions are designed for concrete, masonry, steel, and other substrates.
Always use the correct drive pin for the specific material and installation method. For important or safety-critical connections, rely on the manufacturer’s tested load data and installation instructions rather than selecting a fastener based solely on a general size chart.
With the correct drive pin size, material, installation method, and substrate compatibility, you can create a fast, secure, and reliable mechanical connection.

Engineer Hassan is a Mechanical Engineer with 16+ years of hands-on experience in mechanical hardware, fasteners, and workshop tools. He focuses on size selection, thread identification, and measurement, helping users choose the correct components with accuracy and safety.