When it comes to lifting, rigging, towing, or securing heavy loads, shackles are small components that play a massive role in safety and performance. Choosing the wrong shackle size can lead to inefficient load handling, equipment damage, or even catastrophic failure. That’s why understanding a shackle size chart and how to use it correctly is essential for professionals and DIY users alike.
This complete guide will walk you through everything you need to know about shackle sizes—from basic definitions and types to how to read a shackle size chart, calculate working load limits, and select the right shackle for your application.
What Is a Shackle?
A shackle is a U-shaped or bow-shaped metal connector fitted with a removable pin, designed to join lifting, rigging, or securing components. Commonly used across construction, marine, oil and gas, mining, transport, and off-road recovery, shackles safely connect chains, wire ropes, slings, and anchor points under controlled loads.
Despite their simple appearance, shackles are precision-engineered components designed to handle specific loads under defined conditions.
Why Shackle Size Matters
Shackle size matters because it determines how much load the connector can safely handle, how it fits with other rigging components, and how forces are distributed during use. Selecting the wrong size can compromise strength, stability, regulatory compliance, and overall operational safety in lifting or securing applications.
Key reasons shackle size is critical:
- Safety: Proper sizing prevents overload and reduces accident risk.
- Load efficiency: Correct dimensions ensure even stress distribution.
- Compatibility: Shackles must match chains, slings, and attachment points.
- Compliance: Many industries require adherence to load rating standards.
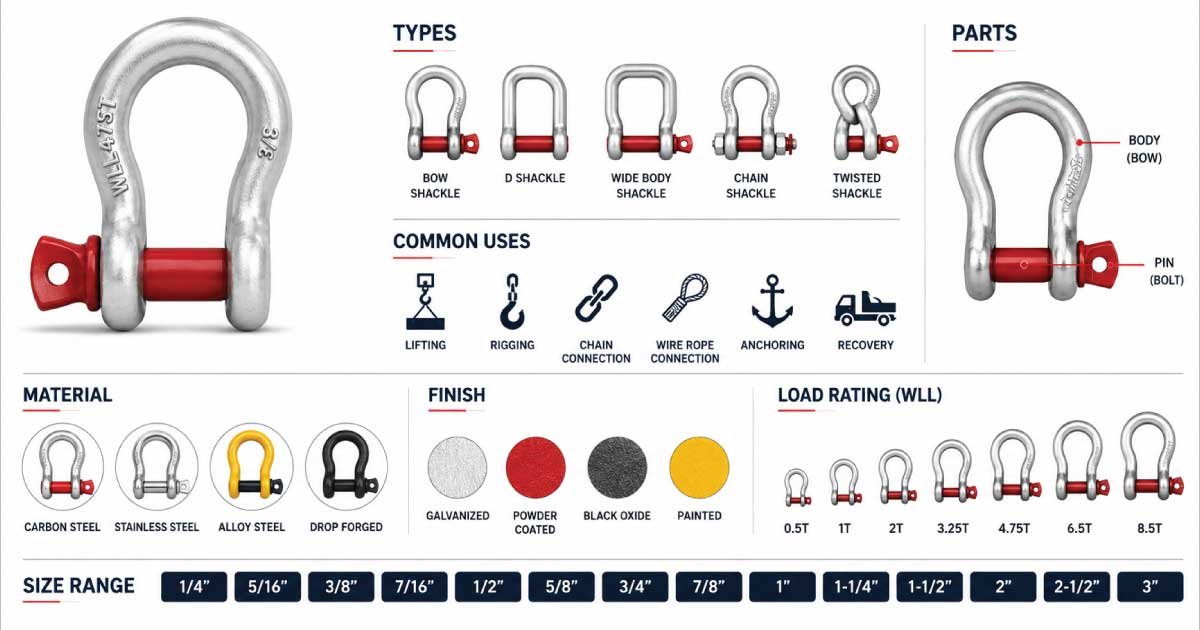
Common Types of Shackles
Before reviewing shackle size charts, it’s essential to understand the primary shackle types, since their shapes influence load behavior and sizing standards. Each type is engineered for specific load directions and applications, and choosing the correct one ensures safer lifting, better performance, and longer equipment life.
1. D Shackles (Chain Shackles)
D shackles have straight sides and a narrow profile, making them ideal for applications where the load is applied in a straight line. Their design limits side loading, which helps maintain strength and stability in controlled lifting and rigging operations.
Best for:
- Vertical lifting
- Straight tension loads
- Compact connection points
2. Bow Shackles (Anchor Shackles)
Bow shackles feature a wide, rounded body that allows loads to be applied from multiple directions. This shape reduces stress concentration and makes them suitable for more dynamic or uneven loading conditions across various industries.
Best for:
- Angular or side-loaded applications
- Marine and towing use
- Situations requiring flexibility
Key Terms in a Shackle Size Chart
Understanding a shackle size chart begins with familiarizing yourself with standard terminology used by manufacturers and safety authorities. These terms define dimensions, load limits, and clearances that determine whether a shackle is suitable for a specific lifting or rigging application and ensure safe, compliant equipment selection.
Understanding a shackle size chart starts with knowing the terminology. Most charts include the following specifications:
Standard Shackle Size Chart (Typical Values)
The following table provides a general reference for commonly used shackle sizes and their typical dimensions. It is intended to help users understand relative sizing and load ratings. Actual measurements and Working Load Limits can vary by manufacturer, material grade, and applicable standards, so specifications should always be confirmed before use.
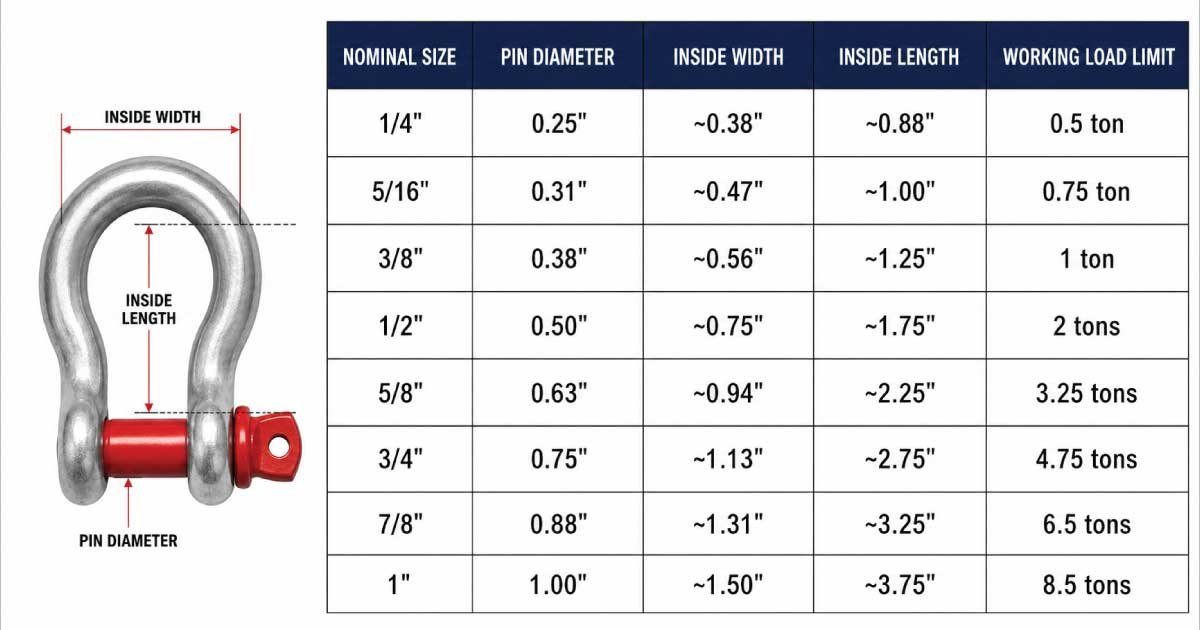
| Nominal Size | Pin Diameter | Inside Width | Inside Length | Working Load Limit |
|---|---|---|---|---|
| 1/4″ | 0.25″ | ~0.38″ | ~0.88″ | 0.5 ton |
| 5/16″ | 0.31″ | ~0.47″ | ~1.00″ | 0.75 ton |
| 3/8″ | 0.38″ | ~0.56″ | ~1.25″ | 1 ton |
| 1/2″ | 0.50″ | ~0.75″ | ~1.75″ | 2 tons |
| 5/8″ | 0.63″ | ~0.94″ | ~2.25″ | 3.25 tons |
| 3/4″ | 0.75″ | ~1.13″ | ~2.75″ | 4.75 tons |
| 7/8″ | 0.88″ | ~1.31″ | ~3.25″ | 6.5 tons |
| 1″ | 1.00″ | ~1.50″ | ~3.75″ | 8.5 tons |
Note: These values are approximate and intended for educational purposes.
How to Read a Shackle Size Chart Correctly
Reading a shackle size chart correctly requires more than checking a single load rating. Proper interpretation involves understanding how load limits, dimensions, application conditions, and safety margins work together to ensure the shackle performs safely and reliably in real-world lifting, towing, or rigging scenarios.
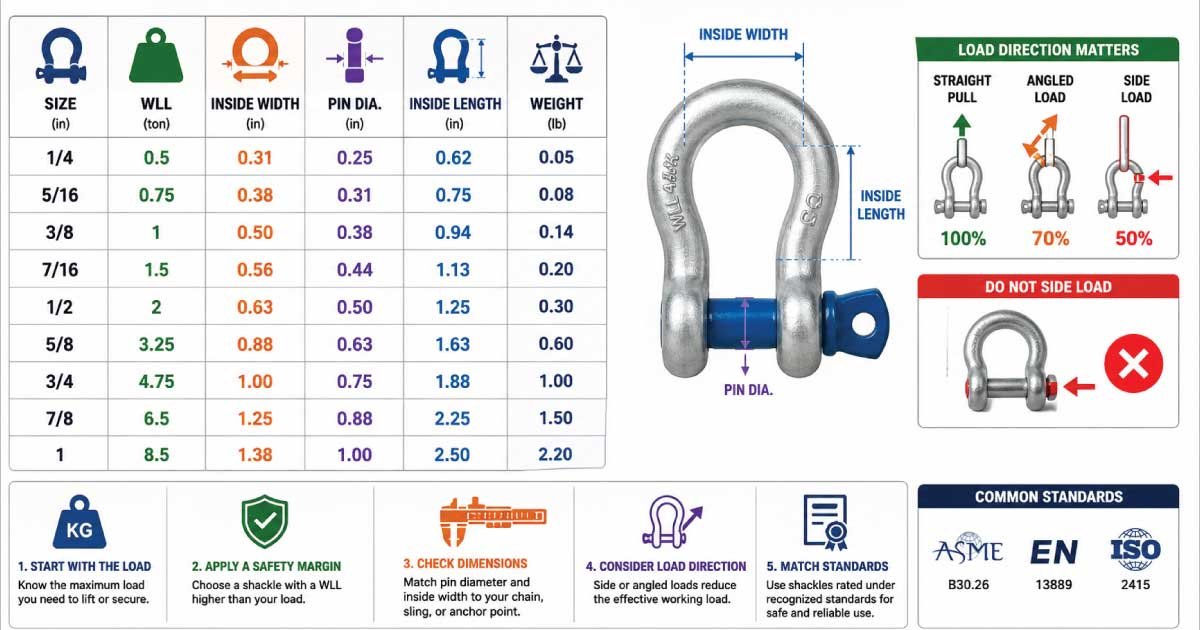
Many users focus only on the working load limit, but that’s just one part of the equation. Here’s how to interpret a shackle size chart properly:
- Start with the load: Determine the maximum load you expect to lift or secure.
- Apply a safety margin: Never select a shackle with a WLL equal to your exact load. Allow room for dynamic forces.
- Check dimensions: Ensure the pin diameter and internal width match your chain, sling, or anchor point.
- Consider load direction: Side loading reduces effective capacity.
- Match standards: Use shackles rated under recognized standards for critical operations.
Working Load Limit vs. Safety Factor
Understanding the difference between Working Load Limit and safety factor is essential for safe shackle selection. While the WLL defines allowable operating load, the safety factor represents built-in strength reserves to account for unexpected stresses, ensuring the shackle does not fail under normal, properly controlled use.
Shackles are designed with built-in safety factors, often 5:1 or 6:1. This means the breaking strength is five or six times the working load limit.
For example:
- A shackle with a 2-ton WLL may have a breaking strength of 10–12 tons.
- You should never exceed the WLL, even if the breaking strength seems high.
The safety factor accounts for:
- Material inconsistencies
- Wear and tear
- Shock loading
- Environmental conditions
Choosing the Right Shackle Size for Your Application
Selecting the correct shackle size requires a structured evaluation of load demands, connection geometry, and safety requirements. A methodical approach helps prevent overload, improper fitment, and regulatory non-compliance, ensuring the shackle performs reliably throughout the intended lifting, rigging, or securing operation.
Here’s a practical step-by-step approach:
- Identify the maximum load weight
- Determine load type (static, dynamic, angular)
- Choose shackle type (D or bow)
- Select WLL with safety margin
- Verify physical dimensions
- Inspect shackle condition before use
For lifting operations, always choose a shackle rated for overhead lifting and compliant with local safety regulations.
Metric vs. Imperial Shackle Sizes
Metric and imperial shackle sizing systems are based on different dimensional standards, which can lead to subtle but important differences. Although sizes may appear similar, mismatching systems can affect fit, load ratings, and overall safety when components are combined.
- Metric shackles may have slightly different pin diameters.
- WLL ratings may differ even if sizes appear close.
- Mixing systems can cause fitment and safety issues.
Always match shackles to the system standard you are using.
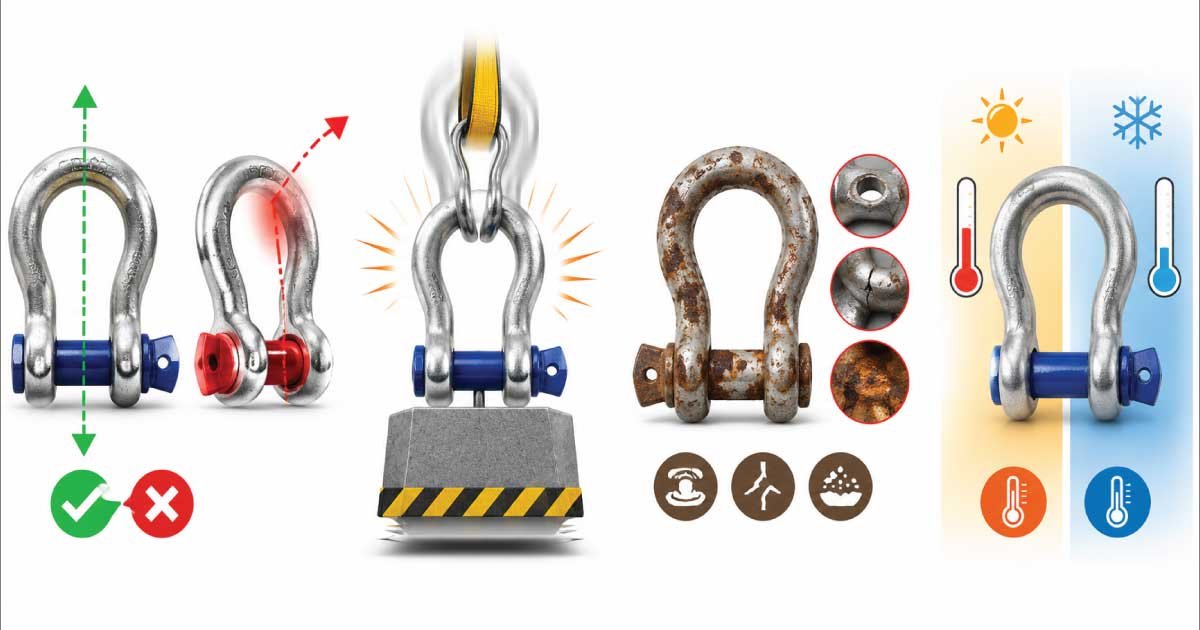
Common Mistakes to Avoid
Many shackle-related failures are caused by improper selection or misuse rather than manufacturing defects. Understanding and avoiding common mistakes helps maintain load integrity, protects equipment, and significantly reduces the risk of accidents during lifting, rigging, towing, or securing operations.
- Using unmarked or unrated shackles
- Exceeding working load limits
- Side loading D shackles
- Mixing worn pins with new bodies
- Using shackles not designed for lifting
Avoiding these mistakes greatly reduces the risk of failure.
Inspection and Maintenance Tips
Routine inspection and proper maintenance are essential for ensuring shackles remain safe and reliable throughout their service life. Regular checks help identify early signs of damage or wear before they develop into serious hazards or lead to sudden equipment failure.
Regular inspection extends shackle life and improves safety:
- Check for cracks, bends, or deformation
- Inspect pin threads and seating
- Look for corrosion or excessive wear
- Replace shackles with illegible markings
- Never attempt to repair a damaged shackle
If in doubt, replace it shackles are inexpensive compared to the cost of failure.
Final Thoughts
A shackle size chart is more than just a table of numbers—it’s a critical safety tool. Understanding how to read and apply shackle size information ensures proper load handling, protects equipment, and most importantly, safeguards people.
By considering working load limits, dimensions, application type, and real-world conditions, you can confidently select the right shackle for any job. Whether you’re lifting heavy machinery, securing cargo, or recovering a vehicle, the correct shackle size makes all the difference.
👉 Finding the correct screw size is key to a strong, reliable connection. This Screw Size Chart covers standard screw dimensions, metric and inch sizes, thread types, head styles, materials, and selection tips. Read the full guide to compare screw sizes, understand specifications, and choose the right screw for any project.

Engineer Hassan is a Mechanical Engineer with 16+ years of hands-on experience in mechanical hardware, fasteners, and workshop tools. He focuses on size selection, thread identification, and measurement, helping users choose the correct components with accuracy and safety.