Lag bolts are among the strongest fasteners used in construction, woodworking, decking, and heavy-duty structural projects. Whether you are replacing an old lag bolt or selecting a new one for a project, knowing how to measure a lag bolt correctly is essential. An incorrect measurement can lead to poor fitment, reduced holding strength, and even structural failure.
This guide explains everything you need to know about measuring a lag bolt, including length, diameter, thread dimensions, and common sizing methods. By the end, you’ll be able to identify and measure any lag bolt with confidence.
What Is a Lag Bolt?
A lag bolt, also called a lag screw, is a heavy-duty fastener designed to securely join wood, metal, and other construction materials. Unlike standard machine bolts, lag bolts feature deep, coarse threads that bite directly into wood, creating exceptional holding strength without requiring a nut on the opposite side. Their durability and load-bearing capacity make them a popular choice for structural and outdoor projects where strong, reliable fastening is essential.
Lag bolts typically feature:
- A hex head
- Coarse threads
- Sharp or tapered point
- Heavy-duty steel construction
They are commonly used in:
- Deck construction
- Timber framing
- Fence installation
- Pergolas
- Wood-to-wood connections
- Wood-to-metal applications
Because lag bolts come in many sizes, proper measurement is important before purchasing replacements, matching existing hardware, or planning a new construction project. Accurate measurements help ensure the fastener provides the required strength, fits correctly within the materials being joined, and meets safety and performance requirements for long-term reliability.
Why Accurate Lag Bolt Measurement Matters
Accurately measuring a lag bolt is essential for ensuring the fastener performs as intended in structural and construction applications. The correct size helps create secure connections, improves load distribution, and reduces the risk of installation problems. Whether replacing an existing lag bolt or selecting one for a new project, precise measurements help ensure compatibility with the materials being joined and contribute to the overall safety, durability, and long-term reliability of the assembly.
Measuring a lag bolt correctly helps ensure:
- Proper fit between materials
- Maximum holding strength
- Safe structural connections
- Compliance with engineering specifications
- Easier replacement of damaged fasteners
Using the wrong size lag bolt may lead to several problems, including wood splitting, reduced load-bearing capacity, stripped threads, or loose connections that weaken over time. Selecting the correct dimensions helps prevent costly repairs, improves project safety, and ensures the fastener can withstand the intended loads throughout its service life.
Tools Needed to Measure a Lag Bolt
Accurately measuring a lag bolt requires a few basic tools that help determine its length, diameter, and thread specifications. Using the proper measuring tools reduces errors and ensures that the lag bolt matches the requirements of your project. Whether you are replacing an existing fastener or selecting a new one, these tools make the measurement process faster and more reliable.
1. Measuring Tape
A measuring tape is one of the most commonly used tools for determining the overall length of a lag bolt. It allows you to quickly measure from the underside of the bolt head to the tip of the threaded end. Measuring tapes are easy to use, widely available, and suitable for both small and large lag bolts used in construction and woodworking projects.
2. Vernier Caliper
A vernier caliper provides highly accurate measurements of the lag bolt’s diameter, thread dimensions, and shank size. Unlike a standard ruler, it can measure with much greater precision, making it ideal when exact bolt sizing is required. This tool is especially useful for identifying bolt sizes that differ only by a small fraction of an inch or millimeter.
3. Thread Gauge
A thread gauge is specifically designed to identify thread pitch and spacing. By matching the gauge teeth to the bolt threads, you can quickly determine the correct thread specification. This tool eliminates guesswork and helps ensure compatibility when replacing lag bolts or matching them with nuts, inserts, or threaded holes.
4. Steel Ruler
A steel ruler is a simple yet effective tool for quick measurements of lag bolt length and approximate diameter. It is more durable and accurate than plastic rulers and works well for basic sizing tasks. While it may not provide the precision of a vernier caliper, it is convenient for general measurements and field work.
5. Bolt Sizing Chart
A bolt sizing chart serves as a reference guide for comparing measured dimensions with standard lag bolt sizes. After measuring the bolt length, diameter, and thread pitch, you can use the chart to identify the closest standard size. This helps ensure that replacement bolts meet industry specifications and fit properly in the intended application.
These simple tools make measuring a lag bolt much more accurate than relying on visual estimates alone. Using the right combination of measuring equipment helps ensure proper bolt selection, secure fastening, and reliable performance in any project.
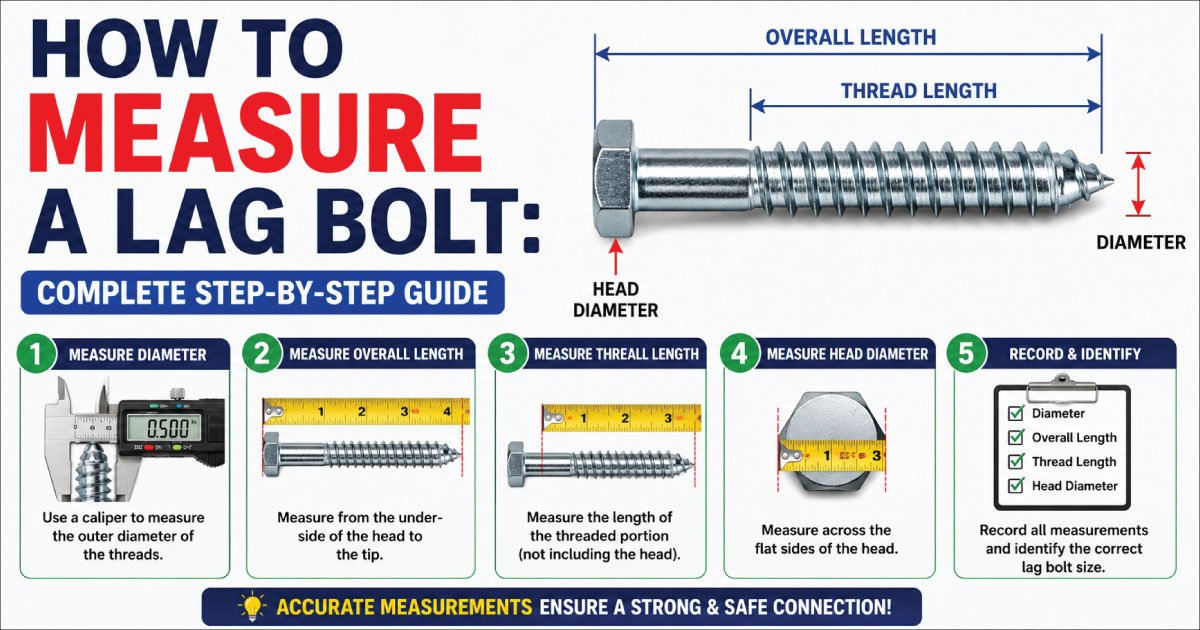
Understand The Lag Bolt Dimensions
Before measuring a lag bolt, it is important to understand the key dimensions that define its size and performance. These measurements help ensure that the bolt is compatible with the material, load requirements, and installation conditions. Knowing how each dimension is measured makes it easier to select the correct lag bolt for construction, woodworking, and structural applications.
1. Bolt Length
Bolt length refers to the distance measured from the underside of the bolt head to the very tip of the threaded end. This measurement determines how deeply the lag bolt can penetrate the material and how much holding power it provides. Selecting the correct length is essential for achieving a secure connection without damaging the materials being fastened together.
2. Bolt Diameter
Bolt diameter is the thickness of the threaded shaft and is one of the most important measurements when identifying a lag bolt. A larger diameter generally provides greater strength and load-carrying capacity. Measuring the diameter accurately helps ensure the bolt fits properly into pre-drilled holes and meets the structural requirements of the application.
3. Thread Specifications
Thread specifications describe the size, spacing, and pattern of the threads along the bolt shaft. These details determine how the lag bolt grips the material and affect its holding strength. Thread measurements typically include thread pitch or threads per inch (TPI), which are important when matching the bolt to specific installation requirements or replacement parts.
Together, these dimensions determine the overall lag bolt size and ensure proper fit, strength, and performance. Understanding bolt length, diameter, and thread specifications allows you to accurately identify lag bolts and choose the right fastener for any project.
How to Measure Lag Bolt Length
Measuring the length of a lag bolt is one of the most important steps when identifying its size. Accurate length measurements help ensure the bolt provides adequate holding strength and penetrates the material to the required depth. Fortunately, measuring lag bolt length is a simple process that can be completed using a ruler or tape measure in just a few minutes.
Step 1: Place the Bolt on a Flat Surface
Begin by placing the lag bolt on a flat and stable surface such as a workbench or table. Positioning the bolt evenly makes it easier to take accurate measurements and prevents errors caused by movement. Ensure the entire bolt is visible and accessible before starting the measurement process.
Step 2: Locate the Underside of the Head
For standard hex-head lag bolts, measurements start from the underside of the bolt head rather than the top. The head sits above the material once installed, so it is not included in the official bolt length. Identifying the correct starting point is essential for obtaining an accurate measurement.
Step 3: Measure to the Tip
Using a steel ruler or tape measure, measure the distance from the underside of the head to the very end of the threaded tip. Keep the measuring tool aligned with the bolt’s centerline for the most precise result. Record the measurement in inches or millimeters, depending on your project’s requirements.
Example
If the measured distance from the underside of the head to the tip is 4 inches, the fastener is classified as a:
4-inch lag bolt
This measurement represents the official bolt length used in product specifications, sizing charts, and installation guidelines.
Remember that the head is not included when measuring the length of a hex-head lag bolt. Using the correct measuring method ensures accurate identification and helps you choose the right lag bolt size for your application.
How to Measure Lag Bolt Diameter
The diameter of a lag bolt refers to the thickness of its threaded shaft and is one of the most important dimensions used to identify bolt size. Measuring the diameter accurately helps ensure proper fit, load capacity, and compatibility with pre-drilled holes. A vernier caliper is the preferred tool because it provides precise and reliable measurements.
Step 1: Use a Vernier Caliper
Begin by opening the jaws of the vernier caliper and positioning them around the threaded section of the lag bolt. Make sure the caliper is held perpendicular to the bolt to obtain an accurate reading. A vernier caliper offers much greater precision than a standard ruler and is recommended for identifying exact bolt sizes.
Step 2: Measure Across the Threads
Close the caliper jaws gently until they touch the outer edges of the threads. The measurement should be taken across the widest part of the threaded section, also known as the major diameter. Avoid applying excessive pressure, as this may affect the accuracy of the reading and potentially damage the threads.
Step 3: Record the Reading
Read the measurement displayed on the caliper and compare it with standard lag bolt diameter sizes. Recording the exact diameter allows you to match the bolt with sizing charts and replacement fasteners. Common lag bolt diameters found in construction, woodworking, and structural applications include:
- 1/4 inch
- 5/16 inch
- 3/8 inch
- 1/2 inch
- 5/8 inch
- 3/4 inch
Example
If the vernier caliper displays a measurement of approximately 0.50 inches across the threaded section, the lag bolt diameter is classified as:
1/2-inch lag bolt
Accurately measuring the diameter ensures proper fastener selection and helps maintain the strength, safety, and reliability of the finished assembly.
How to Measure Thread Diameter
Measuring the thread diameter provides a more accurate way to identify the exact size of a lag bolt. This measurement is especially useful when replacing existing fasteners, matching hardware, or verifying specifications for structural projects. The diameter helps determine the bolt’s strength, load-carrying capacity, and compatibility with pre-drilled holes or mating components.
To measure thread diameter:
- Position the caliper across the outermost thread crests.
- Measure the largest outside diameter.
- Compare with a standard sizing chart.
This measurement is known as the major diameter. It represents the maximum diameter of the threaded portion and is the standard value used when identifying lag bolt sizes. For the most accurate results, use a digital caliper and take measurements at several points along the threaded section to account for wear or manufacturing variations.
How to Measure Thread Pitch
Thread pitch refers to the distance between adjacent threads and is one of the most important measurements when identifying a lag bolt. Knowing the correct thread pitch ensures compatibility with existing hardware, helps when ordering replacements, and allows for accurate matching with engineering specifications. Thread pitch is commonly expressed as threads per inch (TPI) for imperial fasteners.
Using a Thread Gauge
A thread gauge provides the fastest and most accurate method for measuring thread pitch. It contains multiple blades with different thread patterns that can be matched against the bolt. This tool eliminates guesswork and helps identify the exact thread specification quickly, making it the preferred option for professionals and frequent users.
- Match the gauge teeth with the bolt threads.
- Find the gauge that fits perfectly.
- Read the pitch value.
Using a Ruler
If a thread gauge is unavailable, a standard ruler can be used to estimate thread pitch. While this method may not be as precise as a thread gauge, it is often sufficient for general identification and replacement purposes. Careful counting will provide a reasonably accurate measurement.
- Measure one inch along the threaded section.
- Count the number of thread peaks.
- Record the number.
For example:
- 8 threads per inch (TPI)
- 10 threads per inch (TPI)
- 12 threads per inch (TPI)
The thread count helps identify the exact fastener specification and ensures the lag bolt matches the requirements of the application. Accurate thread pitch measurement is especially important when replacing existing hardware, as even small differences in thread spacing can affect performance, fit, and long-term reliability.
Measuring the Hex Head Size
Measuring the hex head size is important when selecting the correct socket, wrench, or spanner for installation and removal. Using the proper tool size helps prevent slipping, rounding off the bolt head, and damaging the fastener. Head size measurements are also useful when replacing lag bolts or verifying hardware specifications for a project.
Step 1: Measure Across Flats
Measure the distance between two opposite flat sides of the hex head using a caliper, ruler, or wrench-sizing tool. Be sure to measure across the flats rather than from corner to corner, as this provides the standard head size used for tool selection. Taking an accurate measurement ensures a proper fit and safer installation.
Step 2: Record the Measurement
After measuring, record the dimension and compare it with standard hex head sizes. Most lag bolts are manufactured with standardized head dimensions that correspond to specific bolt diameters, making identification easier when selecting replacement hardware or installation tools.
Common head sizes include:
- 7/16 inch
- 1/2 inch
- 9/16 inch
- 3/4 inch
- 15/16 inch
Knowing the head size helps ensure you use the correct installation tool, improving efficiency and reducing the risk of damaging the fastener. Proper tool selection also allows the required tightening torque to be applied safely, resulting in a stronger and more reliable connection.
Common Lag Bolt Sizes
The following table shows common lag bolt dimensions used in construction.
| Diameter | Common Lengths |
|---|---|
| 1/4 inch | 1″ to 6″ |
| 5/16 inch | 1″ to 8″ |
| 3/8 inch | 1″ to 10″ |
| 1/2 inch | 2″ to 12″ |
| 5/8 inch | 3″ to 12″ |
| 3/4 inch | 4″ to 16″ |
These sizes cover most residential and commercial applications.
👉 External vs Internal Thread Size Explained for Beginners is a complete guide to help you understand how threads work and how to measure them correctly. It breaks down key differences, tools, and sizing methods in a simple way. Read the full post to avoid common mistakes and improve accuracy.
How to Identify an Unknown Lag Bolt Size
When a lag bolt is removed from its original packaging, determining its exact size can seem challenging. Fortunately, you can accurately identify almost any lag bolt by measuring a few key dimensions and comparing them with standard sizing charts. This process is commonly used by contractors, mechanics, and DIY enthusiasts when replacing existing fasteners or verifying specifications.
Step 1: Measure Length
Start by measuring the overall length of the lag bolt. Place the bolt on a flat surface and measure from the underside of the head to the tip of the threaded end. This measurement represents the official bolt length and is one of the primary dimensions used in sizing charts. Record the length in inches or millimeters for accurate identification.
Step 2: Measure Diameter
Next, determine the diameter of the threaded shaft using a vernier caliper. Position the caliper across the widest part of the threads and record the reading. The diameter helps identify the bolt’s strength and load-carrying capacity while narrowing down the possible size options.
Step 3: Check Thread Count
Measure the thread specification by using a thread gauge or counting the number of threads per inch (TPI). Thread count is important because bolts with the same length and diameter may have different thread patterns. Recording the correct thread pitch ensures you identify the exact fastener specification.
Step 4: Compare With a Sizing Chart
Once you have the length, diameter, and thread count, compare these measurements with a standard lag bolt sizing chart. The chart allows you to match your measurements to industry-standard bolt sizes and verify the correct specification. This step helps eliminate guesswork and ensures accurate fastener replacement.
Example Identification Process
For example, if your measurements show:
- Length: 4 inches
- Diameter: 1/2 inch
- Thread Count: 10 TPI
The bolt can be identified as a 1/2-inch × 4-inch lag bolt with 10 threads per inch.
By following this simple process, you can accurately identify nearly any unknown lag bolt size. Taking precise measurements and comparing them with a sizing chart ensures proper replacement, reliable fastening performance, and a secure fit for your project.
Metric vs Imperial Lag Bolt Measurements
Lag bolts are manufactured using either metric or imperial measurement systems, depending on the country, industry standards, and application requirements. Understanding the difference between these systems is essential when identifying fasteners, purchasing replacements, or selecting compatible tools. Using the wrong standard can lead to poor fitment, damaged threads, and installation difficulties.
Imperial Sizes
Imperial lag bolt sizes are commonly used in the United States and are typically expressed in inches. The diameter and length of the bolt are measured using fractional inch values. These sizes are widely found in residential construction, woodworking, and many traditional building applications throughout North America.
Commonly used in the United States:
- 1/4″
- 5/16″
- 3/8″
- 1/2″
- 5/8″
Metric Sizes
Metric lag bolt sizes are commonly used in Europe, Asia, and many other parts of the world. These fasteners are designated with an “M” followed by the nominal diameter in millimeters. Metric sizing provides a standardized system that is widely used in manufacturing, engineering, and international construction projects.
Common internationally:
- M6
- M8
- M10
- M12
- M16
When measuring imported hardware, always verify whether the bolt follows metric or imperial standards. Although some sizes may appear similar, metric and imperial threads are not interchangeable. Confirming the correct measurement system helps ensure proper fit, maintains structural integrity, and prevents costly installation errors or component damage.
👉 How to Read a Tape Measure: Complete Beginner’s Guide explains step-by-step how to understand markings, inches, fractions, and metric units on a tape. It is perfect for beginners who want accuracy in DIY or construction work. Read the full post to build confidence and avoid measuring mistakes.
Measuring Installed Lag Bolts
In some situations, a lag bolt is already installed in a structure and cannot be removed without damaging the surrounding material. Although measuring an installed lag bolt is more challenging, several methods can help estimate its size with reasonable accuracy. These techniques are useful for maintenance, repairs, and replacement projects when direct access to the entire bolt is not possible.
Step 1: Measure Visible Length
Start by measuring the exposed portion of the lag bolt. Use a ruler or tape measure to determine the distance from the surface of the material to the end of the bolt head. While this measurement does not reveal the full bolt length, it provides a useful reference when estimating the overall size and comparing it with standard lag bolt dimensions.
Step 2: Measure Head Size
The size of the bolt head can often help identify the bolt diameter. Use a vernier caliper or steel ruler to measure the width across the flats of the hex head. Standard lag bolts typically have head sizes that correspond to specific bolt diameters, making this measurement valuable when identifying an unknown fastener.
Step 3: Estimate Diameter
If a portion of the threaded shaft is visible, use a caliper to measure the diameter directly. Measure across the outer edges of the threads to obtain the major diameter. Even a partial measurement can help narrow down the possible bolt sizes and improve the accuracy of your estimate.
Step 4: Check Existing Drawings
Construction drawings, engineering plans, or maintenance records often include detailed information about the fasteners used in a project. Reviewing these documents can provide the exact lag bolt dimensions, eliminating the need for extensive measurements and reducing the chance of selecting the wrong replacement bolt.
Tips for Better Accuracy
- Measure multiple visible dimensions whenever possible.
- Compare measurements with a standard lag bolt sizing chart.
- Use precise tools such as vernier calipers instead of estimating by eye.
- Review project documentation to confirm bolt specifications.
- Take measurements carefully to avoid errors caused by limited access.
While measuring an installed lag bolt is not as accurate as removing and inspecting it directly, these methods can provide a close estimate of its size. Combining visible measurements with reference charts and construction documents often allows you to identify the correct lag bolt for maintenance, repair, or replacement purposes.
Common Mistakes When Measuring Lag Bolts
Accurately measuring a lag bolt is essential for selecting the correct replacement or ensuring compatibility with a project. However, even small measurement errors can lead to choosing the wrong fastener size, resulting in poor performance or installation problems. Understanding and avoiding these common mistakes can help ensure accurate measurements and reliable results.
1. Measuring Including the Head
One of the most common mistakes is including the bolt head when measuring the overall length. For standard hex-head lag bolts, the official length is measured from the underside of the head to the tip of the bolt. Including the head in the measurement will result in an incorrect length and may lead to selecting the wrong replacement bolt.
2. Measuring Worn Threads
Old or heavily used lag bolts often have damaged, flattened, or corroded threads. Measuring across worn threads can produce inaccurate diameter readings because the original thread profile has changed. Whenever possible, measure an undamaged section of the bolt or compare the measurements with a sizing chart to verify accuracy.
3. Using Inaccurate Tools
Relying solely on a tape measure or standard ruler can lead to measurement errors, especially when determining bolt diameter and thread dimensions. Precision tools such as vernier calipers and thread gauges provide much more accurate results. Using the correct measuring equipment helps eliminate guesswork and improves overall measurement reliability.
4. Confusing Diameter With Head Size
The diameter of a lag bolt refers to the thickness of the threaded shaft, not the size of the hex head. Many people mistakenly measure the head and assume it represents the bolt diameter. Since head size and shaft diameter are separate dimensions, confusing the two can result in selecting an incorrect bolt size.
5. Ignoring Thread Pitch
Two lag bolts may have the same length and diameter but different thread specifications. Failing to measure thread pitch or threads per inch (TPI) can lead to compatibility issues when matching bolts with threaded components. Always verify the thread count to ensure the fastener meets the required specification.
Why Accuracy Matters
Accurate measurements help ensure proper fit, structural strength, and long-term performance. Even small errors can cause installation difficulties, reduced holding power, or unnecessary replacement costs. Taking the time to measure correctly and verify all dimensions can save both time and money.
Careful measurement prevents costly mistakes and helps ensure that the selected lag bolt meets the exact requirements of the application.
👉 What Is a Measuring Tape? Sizes, Types, Uses is a simple guide that explains everything about measuring tapes, including how they work, their different sizes, and common types used in DIY and construction. Read the full post to learn accurate measuring skills and choose the right tape for your projects.
Choosing the Right Lag Bolt Size
Selecting the correct lag bolt size is just as important as measuring it accurately. The right size ensures a secure connection, adequate load capacity, and long-term durability. Choosing a bolt that is too small may result in weak fastening, while an oversized bolt can damage materials or create installation difficulties. Several key factors should be considered before making a final selection.
1. Load Requirements
The amount of weight or force the lag bolt must support is one of the most important considerations. Heavier loads generally require larger bolt diameters and longer embedment depths to provide sufficient holding strength. Using an undersized lag bolt for high-load applications can increase the risk of fastener failure and compromise the safety of the structure.
2. Material Thickness
The thickness of the materials being joined plays a major role in determining the required bolt length. A lag bolt should pass through the top material and penetrate deeply enough into the base material to create a strong connection. Insufficient penetration can reduce holding power, while excessive length may extend beyond the intended installation area.
3. Environmental Conditions
Environmental exposure can significantly affect the lifespan of a lag bolt. For outdoor, marine, or high-moisture environments, corrosion-resistant materials such as galvanized steel or stainless steel are often recommended. Choosing the appropriate material helps prevent rust, maintains structural integrity, and extends the service life of the fastener.
4. Engineering Requirements
Structural drawings, engineering specifications, and local building codes should always be followed when selecting lag bolts for construction projects. These requirements are designed to ensure safety, reliability, and compliance with industry standards. Ignoring specified fastener sizes can lead to structural issues and may violate building regulations.
Additional Selection Tips
- Match the bolt diameter to the expected load.
- Choose a length that provides adequate embedment.
- Verify thread specifications before installation.
- Use corrosion-resistant materials in outdoor applications.
- Consult manufacturer recommendations when available.
Why Proper Sizing Matters
A correctly sized lag bolt provides maximum holding strength, improves load distribution, and reduces the risk of loosening or failure over time. Proper sizing also helps ensure efficient installation and long-term performance in both residential and commercial projects.
Choosing the correct lag bolt size improves safety, reliability, and overall project performance while helping prevent costly repairs or replacements in the future.
Example of Measuring a Lag Bolt
When replacing an old lag bolt, taking accurate measurements is essential to ensure the new fastener matches the original specifications and performs correctly in the application. By carefully measuring each key dimension—length, diameter, head size, and thread count—you can confidently identify the correct replacement without guesswork.
Suppose you have an old lag bolt and need a replacement.
Measurements show:
- Length: 6 inches
- Diameter: 1/2 inch
- Head size: 3/4 inch
- Thread count: 6 TPI
The correct replacement would be identified as:
- 1/2″ × 6″ lag bolt
This standardized format is commonly used in hardware stores and engineering specifications, making it easier to communicate exact fastener requirements and ensure compatibility.
Tips for Accurate Measurements
Accurate measurement techniques help prevent sizing errors and ensure proper installation performance. Even small mistakes can lead to loose fittings or structural issues, so careful attention is important during the measuring process.
For the best results:
- Clean dirt and rust before measuring.
- Use a digital caliper whenever possible.
- Measure several locations on worn bolts.
- Double-check measurements before ordering replacements.
- Compare readings with manufacturer sizing charts.
A few extra minutes spent measuring can save time, reduce material waste, and prevent installation problems later in the project.
Conclusion
Learning how to measure a lag bolt is a valuable skill for contractors, DIY enthusiasts, woodworkers, and maintenance professionals. The process involves measuring the bolt length from beneath the head to the tip, determining the shaft diameter, checking thread specifications, and identifying the hex head size when necessary.
With basic tools such as a ruler, caliper, and thread gauge, you can quickly identify any lag bolt and select the correct replacement. Accurate measurements ensure stronger connections, safer structures, and longer-lasting projects. Whether you’re building a deck, installing a fence, or repairing heavy timber framing, properly measured lag bolts help guarantee a secure and reliable result.

Engineer Hassan is a Mechanical Engineer with 16+ years of hands-on experience in mechanical hardware, fasteners, and workshop tools. He focuses on size selection, thread identification, and measurement, helping users choose the correct components with accuracy and safety.