
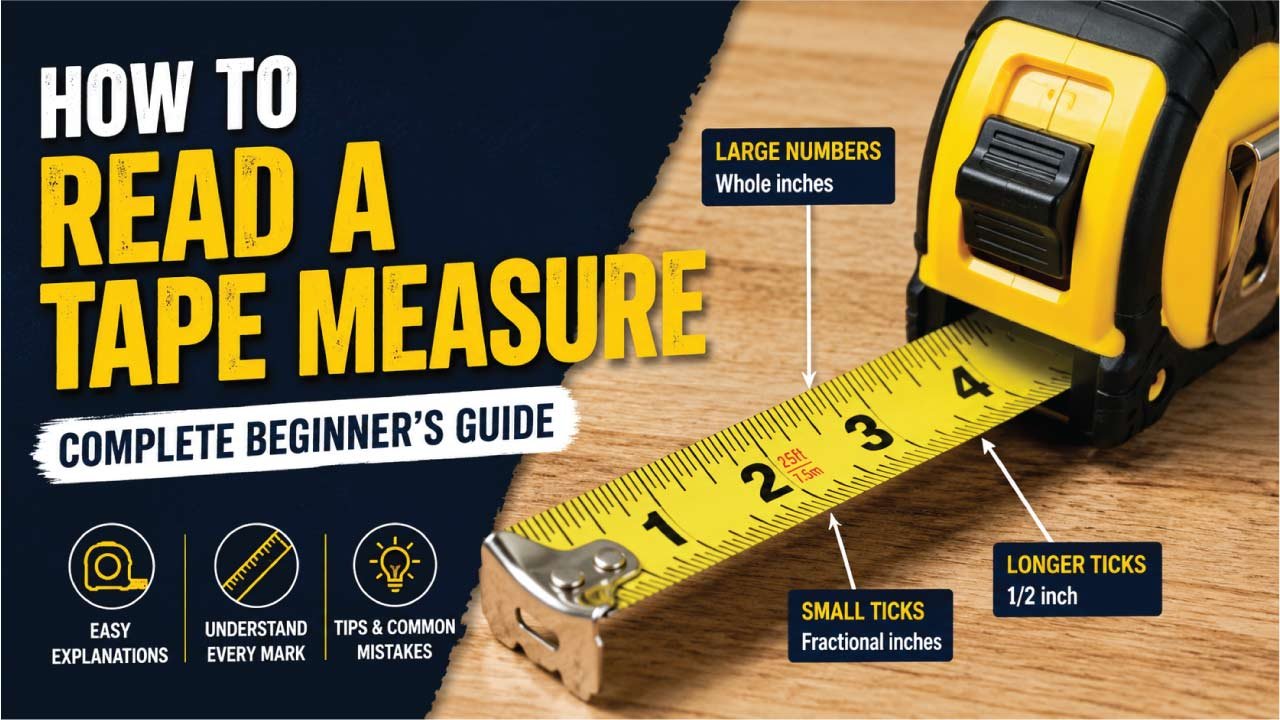
A tape measure is one of the most useful tools in construction, woodworking, tailoring, engineering, and DIY projects. However, many beginners find it confusing to read because of the many lines, fractions, numbers, and measurement markings.
Learning how to read a tape measure correctly is an important skill because accurate measurements help prevent mistakes, wasted materials, and poor fitting parts. Whether you are measuring wood, furniture, fabric, walls, or tools, understanding a tape measure makes every project easier.
In this complete guide, you will learn how to read a tape measure step by step, including inches, fractions, metric measurements, symbols, tips, and common mistakes.
What Is a Tape Measure?
A tape measure is a flexible and portable measuring tool used to determine length, width, height, and distance in various tasks. It is commonly used in construction, carpentry, tailoring, engineering, and everyday home projects where accurate measurements are required for proper fitting and planning.
Most tape measures contain clear markings in both imperial and metric units for easy reading and versatility.
Measurement Units
- Inches
- Feet
- Centimeters
- Millimeters
Some tape measures display both imperial and metric units together, making them suitable for international use and different types of measuring tasks.
Main Parts of a Tape Measure
Before learning how to use or read a tape measure, it is important to understand its main parts. Each component has a specific function that improves accuracy, durability, portability, and ease of use in construction, carpentry, tailoring, and general measurement work.
1. Tape Blade
The tape blade is the long, flexible metal or fiberglass strip that extends from the case and contains measurement markings. It shows inches, feet, centimeters, or millimeters depending on the type. Its flexibility allows users to measure straight distances as well as curved or irregular surfaces accurately.
2. Hook or Tang
The hook or tang is the small metal piece at the end of the tape blade used to catch onto edges for accurate starting points. It slightly moves to adjust for inside and outside measurements. This design ensures precise readings whether measuring internal or external dimensions of objects.
3. Lock Button
The lock button is a control feature that holds the tape blade in a fixed position during measurement. It prevents the blade from retracting, allowing users to take stable and accurate readings. This feature is especially useful when marking measurements or working alone on construction and DIY tasks.
4. Case
The case is the outer protective shell that houses the tape blade and internal spring mechanism. It is usually made from durable plastic, rubber-coated material, or metal. The case protects internal parts from dust, impact, and damage, ensuring long-lasting performance and reliable operation in tough working environments.
5. Belt Clip
The belt clip is a small metal or plastic attachment on the side of the case that allows users to carry the tape measure on a belt or pocket. This improves portability and convenience, making it easy for workers to access the tool quickly during construction or repair tasks.
Understand The Tape Measure Numbers
Tape measure numbers are designed to help users read measurements quickly and accurately. The large printed numbers usually represent inches or centimeters, depending on whether the tape uses the imperial or metric system. Understanding these markings is important for construction, carpentry, tailoring, and all types of measurement work.
1. Imperial System
In the imperial system, commonly used in the USA, tape measures are divided into inches and feet. Each inch is further divided into smaller fractions, allowing very precise measurements for detailed work such as woodworking and construction.
Common Units
- Inches
- Feet
- Fractions of inches
2. Metric System
The metric system is widely used around the world and is based on units of ten, making it simple and easy to understand. Metric tape measures provide precise readings using millimeters, centimeters, and meters for accurate measurement in various technical and everyday applications.
Common Units
- Millimeters
- Centimeters
- Meters
Many tape measures include both imperial and metric systems together, making them versatile and suitable for international use and different types of projects.
👆 What Is a Measuring Tape? Sizes, Types, Uses is a complete expert guide to understanding measuring tape sizes, different types, and practical uses in construction, DIY, and engineering work. Read the full post to learn accurate measurement techniques, avoid errors, and choose the right tape for every project with confidence.
How to Read Inches on a Tape Measure
The inch side of a tape measure is often confusing for beginners because it is divided into multiple small sections. These divisions help you take accurate measurements for detailed work such as carpentry, construction, and repairs. Each smaller line represents a fraction of an inch.
1. Whole Inch Marks
Whole inch marks are the largest numbered lines on the tape measure. These marks indicate complete inches and are usually longer than all other markings for easy identification.
Example
- 1 = one inch
- 2 = two inches
- 3 = three inches
These marks are typically the longest lines on the tape.
2. Half-Inch Marks
Half-inch marks are the second-longest lines found between whole inch markings. They divide each inch into two equal parts, helping users measure medium precision distances.
Example
- 1 1/2 inches
- 2 1/2 inches
- 3 1/2 inches
There is one half-inch mark between every inch.
3. Quarter-Inch Marks
Quarter-inch marks are slightly smaller lines that divide each inch into four equal sections. These are commonly used in woodworking and construction for more precise measurements.
Example
- 1/4 inch
- 3/4 inch
There are four quarter-inch sections in every inch.
4. Eighth-Inch Marks
Eighth-inch marks further divide each inch into eight equal parts. These smaller markings are used when more detailed and accurate measurements are required.
Example
- 1/8 inch
- 3/8 inch
- 5/8 inch
- 7/8 inch
There are eight equal sections in one inch.
5. Sixteenth-Inch Marks
Sixteenth-inch marks are the smallest lines found on most standard tape measures. They provide highly precise measurements for detailed and professional-level work.
Example
- 1/16 inch
- 5/16 inch
- 9/16 inch
These markings allow for maximum accuracy in fine measurement tasks.
Tape Measure Fraction Chart
A tape measure fraction chart helps users quickly understand inch divisions and their decimal equivalents. These fractions are commonly used in construction, woodworking, and engineering to ensure precise measurements. Knowing how fractions convert into decimals makes it easier to read measurements accurately and perform calculations during practical work.
Fraction to Decimal Conversion Table
| Fraction | Decimal | Meaning |
|---|---|---|
| 1/16 | 0.0625 | One-sixteenth |
| 1/8 | 0.125 | One-eighth |
| 1/4 | 0.25 | One-quarter |
| 3/8 | 0.375 | Three-eighths |
| 1/2 | 0.5 | Half inch |
| 5/8 | 0.625 | Five-eighths |
| 3/4 | 0.75 | Three-quarters |
| 7/8 | 0.875 | Seven-eighths |
This chart is especially useful for beginners who are learning how to read tape measures and convert fractional measurements into decimal form for more accurate calculations.
Understanding These Fractions
Understanding inch fractions makes reading a tape measure much easier and more accurate. Once you learn how each small line represents a fraction, you can quickly identify measurements without guessing. This skill is especially useful in carpentry, construction, and DIY projects where precision is important for proper fitting and alignment.
Example: Reading an Inch Measurement
Suppose the tape stops between 5 and 6 inches. You can determine the exact measurement by counting the small fractional lines after the 5-inch mark.
If it reaches the fourth small line after 5 inches
- The measurement is 5 1/4 inches
If it reaches the eighth small line after 5 inches
- The measurement is 5 1/2 inches
If it reaches the twelfth small line after 5 inches
- The measurement is 5 3/4 inches
With regular practice, you will be able to recognize these fractional markings quickly and read measurements with confidence and accuracy.
How to Read Feet on a Tape Measure
Most construction tape measures also include foot markings along with inches. These markings help users measure longer distances more easily without constantly converting inches into feet. Understanding feet measurements is very important in construction, carpentry, and large-scale project planning.
1. Foot Markings
Feet are usually marked differently from inches so they can be easily identified on the tape measure. These markings help users quickly locate each foot interval while measuring longer lengths.
Common Indicators
- Black diamonds
- Red numbers
- Foot symbols (‘)
2. Common Conversions
Feet and inches are directly related, and these conversions are commonly used in everyday measuring tasks.
- 12 inches = 1 foot
- 24 inches = 2 feet
- 36 inches = 3 feet
3. Example of Feet and Inches
A measurement on a tape may be written in combined format for clarity and accuracy.
Example
- 8′ 6″
Meaning
- 8 feet
- 6 inches
This format is commonly used in construction and carpentry because it provides a clear and standard way to represent longer measurements accurately.
👆 How to Match Bolt and Nut Size Correctly: Basic Guide is a must-read expert guide for understanding proper bolt and nut matching, thread compatibility, and accurate sizing. Read the full post to avoid fitting mistakes, ensure strong connections, and master hardware selection with confidence like a professional engineer or DIY expert.
How to Read Metric Tape Measures
Metric tape measures are often easier for beginners because they use a simple decimal system. Instead of fractions, they are based on millimeters, centimeters, and meters, which makes calculations faster and more consistent in construction, tailoring, and engineering work.
1. Millimeters
Millimeters are the smallest units on a metric tape measure. The smallest lines between centimeter marks usually represent millimeters, allowing for very precise measurements.
Key Conversion
- 10 millimeters = 1 centimeter
2. Centimeters
Centimeters are the main numbered markings on a metric tape measure. These marks are larger and easier to read, helping users measure standard lengths quickly and accurately.
Example
- 1 = 1 centimeter
- 2 = 2 centimeters
- 3 = 3 centimeters
3. Meters
Meters are used for measuring longer distances. On larger tape measures, meter markings help simplify big measurements without needing to count many centimeters.
Key Conversion
- 100 centimeters = 1 meter
4. Example of Metric Reading
If the tape stops at:
- 25 centimeters
- plus 6 small lines (millimeters)
Final Measurement
- 25.6 cm
This system is simple, accurate, and widely used in most countries around the world.
Understand The Tape Measure Symbols
Tape measures include special symbols and markings that help improve accuracy and speed in construction and layout work. These markings are designed to guide users in common building measurements, spacing, and structural alignment, making professional tasks easier and more consistent.
1. Black Diamond Marks
Black diamond marks appear on some measuring tapes at regular intervals, usually every 19.2 inches. These symbols are not random; they are specially designed for construction layouts. They help workers quickly identify standard spacing points without manually calculating measurements each time during work.
Purpose
The main purpose of black diamond marks is to help construction workers space floor joists evenly. Using these markings ensures consistent structural support across flooring systems. This improves stability, reduces errors, and speeds up the framing process by providing quick visual reference points.
2. Red Numbers
Red numbers are special highlighted markings found on many measuring tapes. These numbers are used to draw attention to important standard measurements commonly used in construction work. They make it easier for users to quickly identify key spacing points without confusion during measurement tasks.
Common Meaning
Red numbers typically represent 16-inch spacing, which is a standard measurement used for wall stud placement in framing and construction. This spacing is widely used in building structures to ensure strength and alignment. The red markings help workers maintain consistent and accurate structural layouts.
How to Measure Correctly
Proper measuring technique is important for achieving accurate results in construction, carpentry, tailoring, and DIY projects. Even a small mistake in positioning or reading the tape can lead to incorrect cuts or fittings, so following the correct steps ensures precision and better results.
1. Step 1: Hook the Edge
Place the metal hook firmly against the starting edge of the object you want to measure. Make sure it grips properly and does not slip during measurement. The hook is slightly adjustable, helping ensure accurate inside and outside measurements depending on the task.
2. Step 2: Pull the Tape Straight
Extend the tape blade while keeping it straight, tight, and level with the surface. A bent or curved tape can lead to incorrect readings. Maintaining a straight line ensures accuracy, especially when measuring longer distances or marking materials for cutting and installation.
3. Step 3: Read at Eye Level
Always read the measurement at eye level to avoid parallax errors. Looking from an angle can distort the reading and reduce accuracy. Keep your eyes directly above the marking point to ensure you record the correct measurement value in inches, centimeters, or millimeters.
4. Step 4: Lock the Tape
Use the lock button to hold the tape blade firmly in place while measuring or marking. This prevents the blade from retracting and keeps the reading stable. Locking the tape is especially useful when working alone or measuring long distances that require precision.
👆 External vs Internal Thread Size Explained for Beginners is a clear expert guide to understanding thread size differences, measurement methods, and proper fitting of bolts and nuts. Read the full post to avoid compatibility issues, improve accuracy, and master external and internal thread sizing like a professional with complete confidence.
How to Measure Inside Dimensions
Inside measurements are used to measure the internal space of an object or structure. This includes areas where the tape case cannot fully extend, such as enclosed spaces or openings. Accurate inside measurement is important in carpentry, construction, and installation work to ensure proper fitting of materials.
Common Inside Measurement Areas
- Window openings
- Cabinet interiors
- Room dimensions
Measuring Method
Some tape measure cases include their exact case length printed on the side. This helps users calculate the correct total measurement when measuring inside spaces.
Example
If the case length is 3 inches and the tape reads 20 inches inside a space:
Total Measurement
- 20 inches + 3 inches = 23 inches
This method ensures accurate inside measurements even when the tape case itself affects the reading.
Common Tape Measure Reading Mistakes
Beginners often make simple mistakes while using a tape measure, which can lead to incorrect measurements and poor results in construction, carpentry, and DIY projects. Understanding these common errors helps improve accuracy, efficiency, and overall measuring skills.
1. Reading the Wrong Scale
Many tape measures include both metric and imperial units on different sides of the blade. Beginners sometimes read the wrong scale, leading to incorrect results. Always double-check whether you are using centimeters, millimeters, inches, or feet before recording any measurement for accuracy.
2. Measuring at an Angle
Measuring with the tape at an angle instead of keeping it straight can produce inaccurate readings. A curved or slanted tape increases measurement errors. To ensure precision, always keep the tape flat, tight, and aligned properly with the object being measured.
3. Ignoring Hook Damage
The metal hook at the end of the tape can bend or wear out over time. A damaged hook affects accuracy because it shifts the starting point of the measurement. Regular inspection is important to ensure the hook remains straight and functional for precise readings.
4. Confusing Fractions
Beginners often struggle with reading fractional inches such as 1/8, 1/4, 3/8, and 5/8. Mixing these up can lead to incorrect measurements. Practicing fraction recognition helps improve speed and accuracy, especially in carpentry and construction tasks where precision is very important.
Easy Trick for Reading Fractions
A simple trick for reading a tape measure is to count the smallest divisions between whole inch marks. Most standard tape measures divide one inch into 16 equal parts, making it easier to understand fractions step by step without confusion.
If There Are 16 Divisions
Each small line represents a fraction of an inch. By counting these lines, you can quickly convert them into common fractions used in construction and woodworking.
Examples
- 1st line = 1/16
- 2nd line = 2/16 = 1/8
- 4th line = 4/16 = 1/4
- 8th line = 8/16 = 1/2
This method simplifies reading measurements and helps beginners quickly understand fractions without needing complex calculations.
Why Accurate Measurements Matter
Accurate measurements are very important in all types of construction, repair, and design work. Even a small mistake in measurement can lead to serious problems, wasted effort, and extra costs. Using a measuring tape correctly helps ensure that every part fits properly and the final result is precise and professional.
Common Issues
- Wasted materials
- Poor fitting parts
- Crooked installations
- Construction mistakes
Accurate measuring saves both time and money, and it also improves the quality and durability of the final work.
Tape Measure Reading Practice Examples
Here are simple examples for practice.
| Measurement Position | Reading |
|---|---|
| First small line after 2 | 2 1/16 inches |
| Fourth small line after 3 | 3 1/4 inches |
| Eighth small line after 5 | 5 1/2 inches |
| Twelfth small line after 7 | 7 3/4 inches |
Regular practice improves speed and accuracy.
Best Tape Measures for Beginners
For beginners, choosing the right tape measure is important because it makes learning measurements easier and more accurate. A beginner-friendly tape measure should have clear markings, strong build quality, and smooth operation so users can quickly understand readings without confusion or mistakes during daily tasks.
Features to Look For
- Large numbers
- Bold markings
- Fraction labels
- Wide blade
- Smooth lock system
These features help beginners read measurements easily and improve accuracy during practice and real work.
Tape Measure Uses
Tape measures are widely used in different industries and everyday activities where accurate measurement is required. They help ensure proper sizing, fitting, and alignment in construction, carpentry, tailoring, engineering, and home improvement projects for both professionals and beginners.
1. Construction
In construction, tape measures are essential tools used for accurate building layouts, material preparation, and structural measurements to ensure everything fits correctly and safely during the building process.
Common Uses
- Walls
- Floors
- Lumber
- Framing
2. Carpentry
Carpenters use tape measures for precise cutting, shaping, and assembling wood pieces. Accurate measurements help create strong and well-fitted furniture, cabinets, and other wooden structures in woodworking projects.
Common Uses
- Furniture building
- Wood cutting
- Cabinet installation
3. Tailoring
Tailors depend on tape measures to take exact body and fabric measurements. This ensures proper fitting and sizing of clothes, helping in creating comfortable and well-designed garments.
Common Uses
- Body size
- Fabric dimensions
- Clothing length
4. Engineering
Engineers use tape measures for precise technical and industrial measurements. These measurements are important for designing machines, installing equipment, and ensuring accurate alignment in engineering projects.
Common Uses
- Machines
- Equipment
- Installations
5. DIY Home Projects
For DIY home projects, tape measures help homeowners complete small tasks like arranging furniture, hanging items, and planning room layouts with accuracy and ease.
Common Uses
- Hanging pictures
- Furniture placement
- Room planning
👆 What Is a Vernier Caliper? Complete Beginner Guide is an essential expert resource for understanding precise measurement tools, parts, and accurate reading methods. Read the full post to learn how to measure internal, external, and depth dimensions correctly, avoid errors, and master Vernier caliper usage like a professional with confidence.
Tips to Improve Tape Measure Reading Skills
Improving tape measure reading skills takes practice and attention to detail. With consistent learning, users can develop accuracy and confidence in construction, carpentry, tailoring, and DIY tasks. Simple techniques can help beginners understand markings, fractions, and measurements more effectively over time.
1. Learn Fraction Basics
Understanding basic fractions is essential for reading imperial tape measurements. Knowing how 1/2, 1/4, 1/8, and 1/16 relate to each other makes it easier to identify exact values. A strong grip on fractions helps reduce confusion and improves measurement accuracy in practical work.
2. Practice Daily
Regular practice is one of the best ways to improve reading skills. Measure common household objects like tables, doors, or books every day. Repetition helps you become familiar with markings, improves speed, and builds confidence in using a tape measure correctly.
3. Use Good Lighting
Proper lighting is important for reading small markings clearly. Poor lighting can cause mistakes and misreading of measurements. Always work in a well-lit area or use a flashlight when needed to ensure every line and number on the tape is visible and easy to read.
4. Start With Larger Marks
Beginners should first focus on larger markings like whole inches and half inches before moving to smaller fractions. This step-by-step learning approach reduces confusion and builds a strong foundation. Once comfortable, users can gradually progress to reading finer divisions such as 1/8 or 1/16 inches.
Tape Measure Maintenance Tips
Proper maintenance of a tape measure is important for keeping it accurate, durable, and reliable. Regular care helps prevent damage to the blade, hook, and internal spring system, ensuring smooth performance during construction, carpentry, and DIY projects over a long period of use.
1. Avoid Blade Snapping
Never allow the tape blade to snap back quickly into the case. Always guide it slowly using your hand. Fast retraction can damage the internal spring mechanism and reduce tool life. Controlled retraction also improves safety by preventing injuries or accidental surface damage.
2. Keep It Clean
After each use, wipe the tape blade to remove dust, dirt, grease, or moisture. Accumulated debris can affect readability and damage printed markings over time. Keeping the tape clean ensures clear visibility of measurements and maintains long-term accuracy and smooth operation.
3. Store Properly
Always store the measuring tape in a dry toolbox or storage area when not in use. Avoid leaving it in wet or humid environments, as moisture can cause rust or internal damage. Proper storage helps extend the lifespan and maintains the tool’s reliability.
4. Check the Hook
Regularly inspect the metal hook for bending, loosening, or wear. A damaged hook can affect measurement accuracy and lead to incorrect readings. If the hook becomes severely bent or unreliable, it is better to replace the tape for maintaining precise measurement results.
Tape Measure Safety Tips
Tape measures are simple tools, but they can still cause injuries if they are not used properly. The metal blade is sharp, and the retracting mechanism can snap back quickly, leading to cuts or pinched fingers. Safe handling is important for protecting both the user and the tool during everyday work.
Safety Guidelines
- Avoid sharp blade edges
- Wear gloves during heavy work
- Keep fingers clear during retraction
- Do not pull excessively hard
Safe handling prevents accidents and ensures smooth, accurate measuring in all types of projects.
Conclusion
Learning how to read a tape measure is an essential skill for construction, woodworking, tailoring, engineering, and home improvement projects. Although the many lines and fractions may seem confusing at first, understanding inch markings, fractions, feet, and metric units makes measuring much easier.
By practicing regularly and using proper measuring techniques, beginners can quickly improve their accuracy and confidence. Understanding tape measure symbols, fractions, and measurement systems helps prevent costly mistakes and improves work quality.
Whether you are a professional tradesperson or a DIY beginner, mastering tape measure reading is one of the most valuable practical skills you can learn.
FAQs:
Why are there so many lines on a tape measure?
Tape measures have many lines to divide each inch into smaller fractions like halves, quarters, eighths, and sixteenths. These markings help users take precise measurements for carpentry, construction, and DIY projects. The more detailed the markings, the more accurate the measurement becomes for cutting, fitting, and alignment tasks.
What do the black diamonds mean on a tape measure?
Black diamond markings on a tape measure are used to indicate 19.2-inch spacing. This spacing is commonly used in construction for laying out floor joists and framing structures. It helps builders maintain consistent spacing between supports, improving structural strength and simplifying layout work in large construction projects.
Why does the hook move on a tape measure?
The hook on a tape measure is designed to move slightly to ensure accurate measurements. This movement compensates for the hook’s thickness when measuring inside and outside surfaces. It allows users to get correct readings whether the hook is pushed or pulled against an object, improving overall precision.
Is metric easier than inches?
Many beginners find metric measurements easier to understand because they use a decimal system. Units like millimeters, centimeters, and meters are based on powers of ten, making calculations simpler. Unlike inches, which rely on fractions, the metric system reduces confusion and is widely used in science, engineering, and most countries.
What is the smallest marking on a tape measure?
Most standard tape measures include markings as small as 1/16 of an inch. These fine divisions help users take very precise measurements in woodworking, construction, and metalwork. Some specialized precision tools may even include smaller increments for highly detailed measurement tasks.
Why are tape measures curved?
Tape measures are curved to help the blade extend outward without bending or collapsing. The slight curve adds strength and allows the tape to stay rigid when extended horizontally. This design improves readability and makes it easier to measure longer distances without needing support along the entire length.
What material is best for tape measures?
Steel is the most commonly used material because it is strong, durable, and resistant to stretching. It provides long-lasting accuracy for construction and mechanical work. Some tapes also use fiberglass for flexibility and safety in electrical environments where non-conductive materials are required.
How do you read a tape measure correctly?
To read a tape measure correctly, start from the hook and follow the numbered markings carefully. Each line represents a fraction or unit of measurement. Keeping the tape straight and level ensures accuracy. Understanding both large numbers and smaller fractional lines helps avoid mistakes during measurement tasks.

Engineer Hassan is a Mechanical Engineer with 16+ years of hands-on experience in mechanical hardware, fasteners, and workshop tools. He focuses on size selection, thread identification, and measurement, helping users choose the correct components with accuracy and safety.