Tap drill sizes are critical when creating internal threads in metal, plastic, or other materials. Selecting the correct tap drill size ensures strong threads, proper fastener fit, and reduces the risk of broken taps. Whether you’re a machinist, mechanic, engineer, or DIY enthusiast, understanding tap drill charts is essential for successful threading operations.
This complete guide explains tap drill sizes, thread standards, formulas, charts, and tips for choosing the correct drill size before tapping.
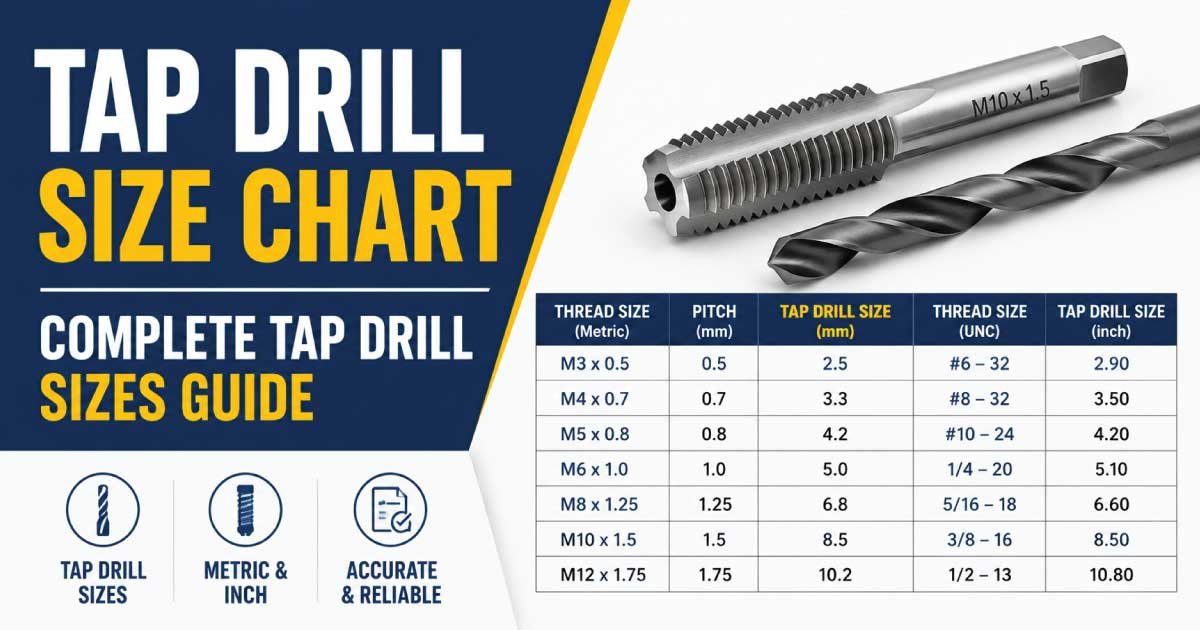
Metric Tap Drill Size Chart (Coarse Threads)
Metric coarse threads are the most commonly used thread standard worldwide.
| Thread Size | Pitch (mm) | Tap Drill Size (mm) |
|---|---|---|
| M3 × 0.5 | 0.5 | 2.5 mm |
| M4 × 0.7 | 0.7 | 3.3 mm |
| M5 × 0.8 | 0.8 | 4.2 mm |
| M6 × 1.0 | 1.0 | 5.0 mm |
| M8 × 1.25 | 1.25 | 6.8 mm |
| M10 × 1.5 | 1.5 | 8.5 mm |
| M12 × 1.75 | 1.75 | 10.2 mm |
| M14 × 2.0 | 2.0 | 12.0 mm |
| M16 × 2.0 | 2.0 | 14.0 mm |
| M18 × 2.5 | 2.5 | 15.5 mm |
| M20 × 2.5 | 2.5 | 17.5 mm |
| M24 × 3.0 | 3.0 | 21.0 mm |
Metric Fine Thread Tap Drill Chart
Fine threads are commonly used where higher strength and precise adjustment are required.
| Thread Size | Pitch (mm) | Tap Drill Size (mm) |
|---|---|---|
| M8 × 1.0 | 1.0 | 7.0 mm |
| M10 × 1.25 | 1.25 | 8.8 mm |
| M12 × 1.5 | 1.5 | 10.5 mm |
| M14 × 1.5 | 1.5 | 12.5 mm |
| M16 × 1.5 | 1.5 | 14.5 mm |
| M18 × 1.5 | 1.5 | 16.5 mm |
| M20 × 1.5 | 1.5 | 18.5 mm |
| M22 × 1.5 | 1.5 | 20.5 mm |
UNC Tap Drill Size Chart
UNC (Unified National Coarse) threads are commonly used in North America.
| Thread Size | Threads Per Inch (TPI) | Tap Drill |
|---|---|---|
| #4-40 | 40 | #43 |
| #6-32 | 32 | #36 |
| #8-32 | 32 | #29 |
| #10-24 | 24 | #25 |
| 1/4″-20 | 20 | #7 |
| 5/16″-18 | 18 | F |
| 3/8″-16 | 16 | 5/16″ |
| 7/16″-14 | 14 | U |
| 1/2″-13 | 13 | 27/64″ |
| 5/8″-11 | 11 | 17/32″ |
| 3/4″-10 | 10 | 21/32″ |
UNF Tap Drill Size Chart
UNF (Unified National Fine) threads provide more threads per inch.
| Thread Size | TPI | Tap Drill |
|---|---|---|
| #4-48 | 48 | #44 |
| #6-40 | 40 | #38 |
| #8-36 | 36 | #29 |
| #10-32 | 32 | #21 |
| 1/4″-28 | 28 | #3 |
| 5/16″-24 | 24 | I |
| 3/8″-24 | 24 | Q |
| 7/16″-20 | 20 | 25/64″ |
| 1/2″-20 | 20 | 29/64″ |
| 5/8″-18 | 18 | 37/64″ |
Tap Drill Formula
Calculating the correct tap drill size is essential for producing strong and accurate internal threads. For metric threads, a simple formula is commonly used to determine the recommended drill bit size before tapping. This formula provides a quick estimate that works well for most standard metric thread applications.
Metric Formula
For metric threads, the tap drill size is calculated by subtracting the thread pitch from the major diameter of the thread.
Tap Drill Size=Major Diameter−Pitch\text{Tap Drill Size} = \text{Major Diameter} – \text{Pitch}
This formula helps ensure there is enough material for the tap to cut strong threads while minimizing the risk of tap breakage.
Example
Consider an M10 × 1.5 thread:
- Major Diameter = 10 mm
- Pitch = 1.5 mm
Using the formula:
10−1.5=8.5 mm10 – 1.5 = 8.5\,\text{mm}
Result
- Required tap drill size = 8.5 mm
Using the correct tap drill size improves thread quality, reduces tapping effort, and ensures proper bolt engagement in the finished threaded hole.
Common Types of Taps
Different taps are designed for specific threading operations, materials, and hole types. Choosing the correct tap improves thread quality, reduces tool wear, and minimizes the risk of tap breakage. The three most commonly used taps are taper taps, plug taps, and bottoming taps, each serving a different purpose during the threading process.
1. Taper Tap
A taper tap features a long, gradual lead-in with several tapered threads at the cutting end. This design allows the tap to enter the hole smoothly and begin cutting threads with less resistance. Because the cutting load is distributed over multiple threads, taper taps are easier to use and less likely to break.
Advantages
- Easier starting
- Reduced cutting force
- Lower breakage risk
Best For
- Hand tapping
- Beginners
Taper taps are often used as the first tap in a threading sequence, especially when creating threads manually.
2. Plug Tap
Plug taps are the most commonly used taps in general machining and repair work. They have a shorter lead-in than taper taps, allowing them to cut threads deeper while still being relatively easy to start. Their balanced design makes them suitable for a wide variety of threading applications.
Advantages
- Good balance between starting and thread depth
- General-purpose threading
Applications
- Machine shops
- Repair work
- Manufacturing
Because of their versatility, plug taps are often the preferred choice for everyday threading tasks.
3. Bottoming Tap
Bottoming taps are designed to cut threads as close as possible to the bottom of a blind hole. They have very few tapered threads, allowing nearly full-depth threading throughout the hole. However, they are usually used only after a taper or plug tap has started the thread.
Advantages
- Maximum thread depth
- Suitable for blind holes
Applications
- Precision machining
- Deep threaded holes
Bottoming taps are essential when maximum thread engagement is required and space at the bottom of the hole is limited.
👉 Feeler Gauge Sizes and Their Practical Uses helps you understand different blade thicknesses, measurement ranges, and how they are used for checking gaps, clearances, and alignment in mechanical and automotive work. Read the full guide to learn how to choose the right Feeler Gauge sizes for accurate, reliable, and professional measurements.
How to Measure Thread Size Before Selecting a Tap Drill
Before choosing a tap drill size, you must first identify the thread dimensions accurately. The two most important measurements are the major diameter and the thread pitch. These values determine the correct drill size needed to create strong, properly formed threads. Accurate measurement helps prevent tapping problems such as weak threads, oversized holes, or broken taps.
Measure the Major Diameter
The major diameter is the outside diameter of the threaded bolt or screw. This measurement identifies the thread size designation, such as M6, M8, or M10. A digital caliper provides the most accurate measurement and is commonly used in workshops and machine shops.
Steps
- Clean the threads to remove dirt or debris.
- Use a digital caliper to measure the outside diameter of the bolt.
- Record the measurement in millimeters.
- Match the value to the nearest standard thread size.
Examples:
- 6 mm = M6
- 8 mm = M8
- 10 mm = M10
The major diameter forms the first part of the thread designation and is essential for selecting the correct tap.
Determine Thread Pitch
Thread pitch is the distance between adjacent thread peaks. It determines how fine or coarse the thread is and plays a critical role in calculating the correct tap drill size. The most accurate way to measure pitch is with a thread pitch gauge.
Steps
- Select a thread pitch gauge.
- Match the gauge teeth to the thread profile.
- Find the gauge that fits perfectly between the threads.
- Read and record the pitch value.
Examples:
- M8 × 1.25
- M10 × 1.5
- M12 × 1.75
The pitch determines the correct drill size because it affects how much material the tap must remove to form the threads. Measuring both the major diameter and thread pitch accurately ensures proper tap drill selection, easier tapping, and stronger finished threads.
👉 Screwdriver Size Selection for All Screws helps you understand different screwdriver tips, sizes, and how to match them with various screw heads like Phillips, flathead, and Torx. Read the full guide to choose the right Screwdriver size for accurate fitting, better grip, and safe, damage-free work in every project.
Common Tap Drill Sizes Used in Workshops
The following tap drill sizes are among the most frequently used:
| Thread Size | Drill Size |
|---|---|
| M4 × 0.7 | 3.3 mm |
| M5 × 0.8 | 4.2 mm |
| M6 × 1.0 | 5.0 mm |
| M8 × 1.25 | 6.8 mm |
| M10 × 1.5 | 8.5 mm |
| M12 × 1.75 | 10.2 mm |
These cover many automotive, manufacturing, and maintenance applications.
Steps for Tapping Threads
Tapping threads is the process of cutting internal threads into a drilled hole so that a bolt or screw can be installed securely. Following the correct procedure helps produce accurate threads, reduces the risk of tap breakage, and ensures smooth fastener installation. The following steps outline the standard method for creating high-quality threaded holes.
Step 1: Mark the Hole Location
Before drilling, accurately mark the hole location to ensure proper alignment. A center punch creates a small indentation in the material, helping the drill bit stay in position when drilling begins. This prevents wandering and improves drilling accuracy.
- Use a center punch to prevent drill wandering.
Step 2: Drill the Hole
Select the correct tap drill size from the tap drill chart and drill the hole to the required depth. Maintaining a straight drilling angle is important for accurate thread formation. When drilling metal, cutting fluid helps reduce heat and improves tool life.
- Use the tap drill size specified in the chart.
- Apply cutting fluid when drilling metal.
Step 3: Chamfer the Hole
Creating a small chamfer at the hole entrance makes it easier for the tap to start cutting threads. The chamfer also reduces burrs and helps guide the tap into proper alignment, resulting in cleaner and more accurate threads.
- A small chamfer helps guide the tap into the hole.
Step 4: Start the Tap
Position the tap carefully and ensure it remains perpendicular to the work surface. Starting the tap straight is critical because misalignment can damage the threads or break the tap. Apply steady pressure and rotate the tap slowly.
- Keep the tap perpendicular to the surface.
- Turn slowly and evenly.
Step 5: Break Chips Regularly
As the tap cuts threads, metal chips accumulate inside the hole. These chips must be broken and cleared regularly to prevent binding and excessive cutting force. This technique improves thread quality and reduces the risk of tap failure.
For manual tapping:
- Turn forward half a turn
- Reverse slightly
- Continue cutting
This prevents chip buildup.
Step 6: Clean the Threads
After tapping is complete, remove all chips, cutting fluid, and debris from the threaded hole. Clean threads ensure proper bolt engagement and make it easier to inspect the finished work. A final test with the intended fastener confirms thread accuracy.
- Remove chips and debris after tapping.
- Test with the intended bolt or screw.
Following these steps helps create strong, accurate threads while extending tool life and reducing the likelihood of tapping errors.
👉 Micrometer Screw Gauge Reading Guide for Beginners explains how to measure small objects with high precision using sleeve, thimble, and vernier scale readings. Read the full guide to understand step-by-step measurement, least count, and correct usage of a Micrometer Screw Gauge for accurate results in engineering and workshop work.
Common Tap Drill Size Mistakes
Selecting the wrong tap drill size or using improper tapping techniques can lead to poor thread quality, broken tools, and weak fastener connections. Understanding these common mistakes helps ensure successful threading operations, longer tool life, and stronger finished threads.
1. Using Too Small a Drill Bit
One of the most common mistakes is drilling a hole that is too small before tapping. A smaller hole leaves too much material for the tap to remove, increasing cutting resistance and placing excessive stress on the tool. This makes tapping more difficult and greatly increases the chance of failure.
Consequences include:
- Broken taps
- Difficult tapping
- Damaged threads
2. Using Too Large a Drill Bit
Using an oversized drill bit creates a hole with insufficient material for proper thread formation. Although tapping may feel easier, the resulting threads are often weak and unable to provide adequate holding strength for bolts and screws.
- Oversized holes create weak threads.
- This reduces thread engagement and holding strength.
3. Ignoring Thread Pitch
Many users focus only on thread diameter and overlook thread pitch. However, two bolts can have the same diameter while requiring different tap drill sizes because their pitches differ. Always verify both measurements before selecting a drill bit.
- Two bolts may have the same diameter but different pitches.
- Always verify both diameter and pitch.
4. Tapping Without Lubrication
Failing to use cutting fluid is another common mistake, particularly when working with steel, stainless steel, or other hard metals. Lubrication helps the tap cut more efficiently and reduces the risk of overheating and tool wear.
Cutting fluid reduces:
- Heat
- Friction
- Tool wear
Especially when threading steel and stainless steel.
Avoiding these mistakes helps produce stronger threads, smoother tapping operations, and more reliable fastener performance while reducing the risk of costly tool damage.
Advantages of Using the Correct Tap Drill Size
Using the correct tap drill size is essential for producing high-quality internal threads. Proper sizing improves thread strength, reduces machining problems, and ensures that bolts and screws fit securely. Whether working in manufacturing, maintenance, or DIY machining projects, selecting the right tap drill size leads to better results and longer tool life.
1. Stronger Threads
A correctly sized tap drill leaves the proper amount of material for the tap to cut into. This creates well-formed threads with excellent holding strength and durability. Stronger threads improve the reliability of bolted connections and help prevent thread failure under load. Provides proper thread engagement.
2. Easier Tapping
When the drill hole is the correct size, the tap can cut threads more smoothly with less resistance. This makes the tapping process easier, improves control, and reduces the effort required, especially during manual threading operations. Reduces cutting resistance.
3. Longer Tool Life
Using the proper tap drill size reduces stress on the cutting edges of the tap. Lower cutting forces mean less wear, less heat generation, and fewer chances of premature tool failure, helping taps remain effective for a longer period. Minimizes wear on taps.
4. Better Fastener Fit
Accurate thread dimensions ensure that bolts and screws fit properly within the threaded hole. This improves fastening performance, reduces looseness, and creates more secure mechanical assemblies. Improves bolt and screw performance.
5. Reduced Breakage
One of the biggest advantages of proper tap drill sizing is the reduced risk of tool and component damage. Correctly sized holes lower the cutting load on the tap, decreasing the likelihood of broken taps, damaged threads, and costly rework. Lowers the risk of broken taps and damaged parts.
Final Thoughts
A tap drill size chart is one of the most important references in machining and metalworking. Choosing the correct drill size before tapping ensures strong threads, accurate fastener fit, and smooth machining operations. Whether you’re creating metric, UNC, or UNF threads, keeping a reliable tap drill chart nearby helps reduce errors, improve efficiency, and extend tool life.
FAQs:

Engineer Hassan is a Mechanical Engineer with 16+ years of hands-on experience in mechanical hardware, fasteners, and workshop tools. He focuses on size selection, thread identification, and measurement, helping users choose the correct components with accuracy and safety.